Showing posts with label Recipes - Breads. Show all posts

Tuesday, July 23, 2013

Zucchini Basil Corn Muffins


Pin this Recipe on Pinterest

If you are looking for new ways to use up your garden zucchini and basil and you don't mind turning on your oven, try these savory and tasty Zucchini Basil Corn Muffins. I make several batches to store in the freezer for the colder months when soups are a menu staple.


My inspiration was a similar recipe that I found years ago on the popular blog, Get Rich Slowly.

Zucchini Basil Corn Muffins

Ingredients

  • 2 eggs
  • ¾ cup milk
  • ⅔ cup vegetable oil
  • 1 cup corn meal
  • 1 cup all purpose flour
  • ¼ cup sugar
  • 1 tablespoon baking powder
  • ½ teaspoon salt
  • 2 cups shreddded zucchini
  • 2 tablespoon finely chopped fresh basil
  • ¼ cup shredded Parmesan cheese

Instructions


1. Preheat oven to 425 degrees.

2. In a large bowl, whisk the eggs, milk and oil.

3. Combine the corn meal, flour, sugar, baking powder, and salt and pour into the egg mixture. Stir until just combined. Don’t over-mix.

4. Stir in the zucchini, basil, and Parmesan. Again, don’t over-mix.

5. Prepare a muffin pan with non-stick spray and fill it with the batter. Bake for 20-25 minutes or until golden brown. Makes 12 muffins.

Make several batches and freeze in freezer bags to serve with soups during the colder months.

Print recipe for Zucchini Basil Corn Muffins.

This post is linked to Thrifty Thursday and Weekend Potluck.

Thanks for reading. If you would like to receive FREE updates of FBS, there are four ways to do so:
Follow Me on Pinterest

Monday, March 5, 2012

Broccoli Cornbread Muffins


Soup and Salad night seems naked with just soup and salad. Bread rounds out (and dresses up) the meal. Many times, I make a loaf of artisan bread, but when we want some variety, I like to serve these muffins. They go well with any hearty soup recipe or just warmed up in the microwave and slathered with butter for a snack.

Broccoli Cornbread Muffins

Ingredients

  • 1 cup cornmeal
  • 1 cup flour
  • 3 teaspoons baking powder
  • ½ teaspoon salt
  • ½ cup sour cream
  • ⅔ cup milk
  • ½ cup canola oil - I used olive oil, because I was out of canola. Olive oil works if you don't mind its strong flavor in baked goods.
  • 2 eggs, beaten
  • 1 (10 oz box) frozen chopped broccoli, thawed

Instructions

1. Preheat oven to 425 degrees.

2. Combine the cornmeal, flour, baking powder, and salt in a small bowl. Set aside.

3. Mix together the sour cream, milk, oil, and eggs. Add the dry ingredients and mix well to combine. Fold in the broccoli.

4. Coat a 12-muffin pan with cooking spray. Pour the batter into the muffin pan. Bake for 15-20 minutes.

Enjoy!

Thanks for reading. If you would like to receive FREE updates of FBS, there are four ways to do so:
Follow Me on Pinterest

Monday, September 5, 2011

Pineapple Zucchini Muffins (and my very first giveaway)

I love muffins. I bake a big batch and then store them in the freezer. This is great portion control for me. If they are in the freezer, I won't eat the whole batch in 24 hours. Instead, I enjoy at my leisure for breakfast or a snack with my coffee.

Most of my muffin recipes call for vegetable oil, but when Tropical Traditions sent me a jar of certified organic coconut oil to review, my wheels started turning. At the same time that I received the oil, I had more zucchini than I knew what to do with, so I baked up a batch of these Pineapple Zucchini muffins and used the coconut oil in place of the vegetable oil. The result was delicious. They have a subtle coconut taste and they smell so coconut-y. I am really enjoying snack time.

I enjoyed these muffins so much, that I am very excited to try the coconut oil in other recipes. The possibilities must be endless. I plan on perusing the Tropical Traditions coconut recipes on their blog for more ideas.

Pineapple Zucchini Muffins
  • 3 eggs
  • 1 cup coconut oil
  • 2 cups sugar
  • 2 tsp vanilla
  • 2 cups shredded zucchini
  • 1 (10 oz) can crushed pineapple, drained
  • 3 cups flour
  • 2 tsp baking soda
  • ½ tsp baking powder
  • 1 tsp salt
  • 1 tsp nutmeg
  • 1 ½ tsp cinnamon
  • 1 cup chopped walnuts, optional
Preheat oven to 350 degrees.

Mix together the eggs, coconut oil, sugar, and vanilla. Stir in the zucchini and pineapple.

Mix together the flour, baking soda, baking powder, salt, nutmeg, and cinnamon. Add to the zucchini mixture and stir until combined. Stir in the walnuts.

Pour into a greased muffin pan. This batter makes 24 muffins.

Bake at 350 degrees for 25 minutes or until golden and a toothpick comes out clean.

Print recipe for Pineapple Zucchini Muffins
.

Welcome to my VERY FIRST Giveaway!

THIS GIVEAWAY IS NOW CLOSED. CONGRATULATIONS TO BETH!

Giveaway Details:
One quart jar of organic coconut oil will be given away to one lucky winner.

You have up to three chances to enter to win the coconut oil:

1. Subscribe to Tropical Traditions’ email Sales Newsletter, then come back and leave a comment telling me you subscribed. Twice a week you will receive the Sales Newsletters that feature weekly sales discounts, FREE product specials, FREE recipes, and much more.

2. Like Tropical Traditions on Facebook and then come back and leave a comment telling me so.

3. Follow @troptraditions on Twitter and then come back and leave a comment telling me so.

This giveaway is open to U.S. and Canadian residents only.

I’ll randomly choose a winner at 6:30 am EST on Monday, September 12. Please use a valid email when commenting, so that I may contact you if you win.

Good Luck!

Disclaimer: Tropical Traditions provided me with a free sample of this product to review, and I was under no obligation to review it if I so chose. Nor was I under any obligation to write a positive review or sponsor a product giveaway in return for the free product.

Thanks for reading. If you would like to receive FREE updates of FBS, there are four ways to do so:

Monday, February 21, 2011

Banana Oatmeal Muffins


If you have over-ripe bananas that no one wants to touch, this is a great recipe to make and have for those 'grab-n-go' mornings. You know those mornings, where you need to eat something, but there is no time to make breakfast for yourself or your family.

This is also a great freezer recipe.

Banana Oatmeal Muffins
adapted from Cooking Light
  • 1 ½ cups flour
  • ⅔ cup sugar
  • 1 ½ tsp baking powder
  • ¼ baking soda
  • ¼ tsp salt
  • ¾ regular oats
  • 1 cup mashed ripe bananas - about 2-3
  • ⅓ cup buttermilk (don’t have buttermilk - add 1 tsp white vinegar to ⅓ cup regular milk, I use 2%, and let the milk sit for a few minutes)
  • ¼ cup vegetable oil
  • 1 tsp vanilla extract
  • 2 large eggs, lightly beaten
  • ½ cup chopped pecans or walnuts, optional
  • cooking spray

In a large bowl, combine the dry ingredients: flour, sugar, baking powder, baking soda, salt, and oats. Stir with a spoon or wisk to mix together.

In a separate bowl, combine the bananas, milk, oil, vanilla extract and eggs. Add the dry ingredients. Stir until just moist.

Pour batter into a 12-muffin pan that has been coated with cooking spray. If desired, sprinkle muffin batter with the nuts.

Bake in a preheated 350 degree oven for 25 minutes or when a toothpick inserted in the center of a muffin comes out clean. Cool slightly in pan on wire rack. Remove from pan and cool completely on wire rack.

Makes 12 muffins.

Print recipe for Banana Oatmeal Muffins.

Thanks for reading. If you would like to receive FREE updates of FBS, there are four ways to do so:


This post is linked to:

Monday, February 14, 2011

Artisan Bread in Five Minutes a Day: My Experience


Upon my request, my husband bought me Artisan Bread in Five Minutes a Day: The Discovery That Revolutionizes Home Baking for Christmas in 2009.


with the inscription...


and no, we are not 300 lbs...yet.

We love our fresh baked bread. Who doesn't?

Freshly baked and smothered with butter or hummus or strawberry jelly.


Right after Christmas 2009, I made a batch of this bread and it was tasty, but for some reason I put the book back on the shelf and actually forgot about it.
This past November in 2010, I was in the bakery at Wegmans looking for a good loaf of bread for a special dinner for my husband's birthday. The freshly baked breads looked and smelled heavenly, but they were $4.50...for one loaf of bread. I indulged and as we were eating the $4.50 loaf, I remembered the cook book and I have been making the Artisan bread ever since.

The book starts with the Master Recipe and step-by-step, precise instructions. This dough mixes up quickly, especially if you use the dough hook of your mixer. After the dough rises for a couple of hours on the counter, it is ready to use or you can refrigerate it for up to two weeks. One batch of the Master Recipe makes 4 loaves of fresh bread, or pizza, or any of the dozens of recipes that are included in the book. This master recipe is the starter to wonderful variations and recipes. This bread will have a crispy, crackling crust, but a tender, delicious inside. There is no kneading involved at any point. When you are ready to bake a loaf, you pull off a pound of the dough that is in your fridge, shape it into a loaf, let it rise for 20-40 minutes, depending on the age of the dough and bake. The "5 minutes" part is the active effort that it takes to make the bread, the shaping into a loaf.


I have been keeping a batch of the dough in my refrigerator ever since November. It was the reason I bought four 5-lb bags of flour during the holiday sales back in the December.

I take the full 2 weeks to use the dough. I usually make 2 loaves of bread and 2 pizzas with the dough. We enjoy a nice loaf with one meal a week. We have also been having a homemade pizza night every Saturday night.

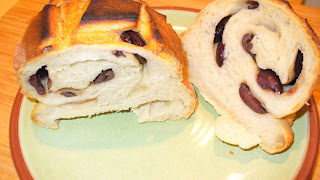
There is a Master Recipe and then several variations of the master. Right now I make the Olive Oil Version as it works nicely with pizzas and my favorite bread, Olive Bread. I may or may not have a slight addiction to it. I am a lover of all things Kalamata.


The pizzas took me a few times to get used to, but now it is SO easy. I had never made pizza this way and I am hooked on the technique. Before, I just put my homemade pizza (with store bought crust...ahem) on the pizza stone and put it in the oven.

Now, the oven is preheated at 550 degrees F (500 if that is your oven's maximum) with the pizza stone already in the oven for 20 minutes. While the oven is preheating, I roll out the dough and then place on an upside down cookie sheet that is covered liberally with cornmeal. I then add my toppings. I don't have a pizza peel, which is recommended, but the cookie sheet has been working well for me.


After 20 minutes of preheating, with a quick shake I carefully slide the pizza on to the heated stone. The cornmeal makes this easy.


It bakes for 8-10 minutes and Viola: delicious, home baked pizza with a crispy crust. We all love it and I am going to start making different variations of pizzas. Per my kids' requests, our pizzas have all been cheese.


The cost savings for Artisan Bread in Five Minutes a Day:

The Master Recipe calls for 6 1/2 cups of flour. When I use the sale flour that I bought in December and when I buy the yeast on sale and with a coupon, I'll spend about $1 to make one batch of the Master Recipe. Remember that one batch of the Master Recipe makes 4 loaves of fresh bread, so the final price of a loaf is 25 cents! Also remember that I spent $4.50 on ONE loaf of fresh store-bought bread. The final price of the home-made bread will vary slightly depending on what you pay for your ingredients and it will go up when you add other ingredients like my beloved Kalamata olives, but the savings will always be substantial over the store-bought version.

Some supplies that you'll need for Artisan Bread in Five Minutes a Day:

1. A good pizza stone. The book suggests you get a high quality, half-inch thick baking stone. Apparently, the cheaper, thinner ones crack easily. Fortunately, I have had a stone from Pampered Chef for about 15 years and it is still going strong. You could use a baking sheet, but you won't get the crisp crust on your bread like you will with a stone. The stone absorbs the excess moisture from the wet dough and that is what creates the crackling, crisp crust.

2. Oven Thermometer. The book states that this item isn't optional, but I don't have one yet.

3. A 5-quart plastic storage container with a lid to store the dough in your refrigerator.

4. Boiler tray to hold the water for steam. I used the one that came with my oven. The stone is placed in the middle rack and a boiler tray is placed on the bottom rack. A cup of water is placed in the tray when the dough is put in the oven. The steaming helps get the crackling, crispy crust in a lot of the breads. This isn't needed for the pizza.

5. A pizza peel to slide the dough on to the hot stone. I don't have a peel and like I stated above, I use an upside down cookie sheet. This has worked fine for me, but I might eventually get a peel.

6. Scale. This isn't necessary, but I weigh my bread when I break off a piece. I found in the beginning that I was breaking off too big a piece and then it wasn't baking all the way through. I didn't realize it until I cut through the loaf....GRRRRR. I use a simple kitchen scale that I have had for years. Eventually, I'm sure I'll be able to eyeball the dough that I am breaking off, but right now I do weigh it.


Some tips from my experience thus far with Artisan Bread in Five Minutes a Day:

1. Cornmeal is your best friend with this technique. In the beginning, I wasn't using enough and when I would try to slide the bread or pizza off the cookie sheet and on to the hot stone, the dough would stick. I now use a liberal amount of cornmeal and I make sure the dough is near the end of the upside down cookie sheet so it doesn't have far to slide.

2. Don't be discouraged. At first, I had a hard time forming the dough into a ball. My dough balls never looked as formed as the ones in the book. The dough can be quite sticky and I think that was why I initially put the cookbook back on to the bookshelf. I think I was just dough-challenged in the beginning. I found this technique gets easier each time I bake some bread.

I'm excited to branch out and try other recipes, like Vermont Cheddar Bread, Roasted Garlic Potato Bread, Pecan Caramel Rolls, Strombolis, Soft Pretzels or the Focaccia with Onion and Rosemary...should I go on?? Okay...the Oatmeal Pumpkin Bread, Caramelized Onion and Herb Dinner Rolls, Prosciutto and Olive Oil Flat bread, Spinach Feta Bread, Sun-Dried Tomato and Parmesan Bread and so much more. I think you get the picture; the possibilities in this cookbook are endless.

There is a new version, Healthy Bread in Five Minutes a Day: 100 New Recipes Featuring Whole Grains, Fruits, Vegetables, and Gluten-Free Ingredients that I want to try.

I see a bright future and it doesn't include store-bought bread.

Do you bake your own bread? Have you read and tried the Artisan Bread in Five Minutes a Day method? Let us know in the comments.

Thanks for reading. If you would like to receive FREE updates of FBS, there are four ways to do so:
This post is linked to Works for Wednesday at We are That Family and Ultimate Recipe Swap at Life as MOM.

Affiliate Disclosure: I am an Amazon Associate, and if you make a purchase through my link, I earn a small percentage--at no cost to you! Thanks for supporting Family Balance Sheet.

Monday, November 16, 2009

Butternut Squash and Cranberry Muffins

This squash family that was living in my kitchen was roasted last week and is now in my freezer for future use. Butternut squash is one of my favorite fall foods and makes its way to our table a couple times a week during the season. If you haven't tried butternut squash, it is extremely versatile and very healthy. Loaded with fiber, Vitamin A and beta carotene. Butternut squash can be used as a substitute in any recipe that calls for pumpkin.


That is what I did in this recipe. I found it in one of my Cooking Light magazines several years ago and have adapted the recipe a little.


Butternut Squash and Cranberry Muffins
adapted from this recipe in Cooking Light


Ingredients:

  • 2 1/4 cups flour
  • 2 tsp pumpkin pie spice
  • 1 1/2 tsp baking soda
  • 1 tsp ground ginger
  • 1/4 tsp salt
  • 1 cup dried cranberries (could also use raisins)
  • 1 cup packed brown sugar
  • 1 cup roasted butternut squash
  • 1/3 cup buttermilk
  • 1/3 vegetable oil
  • 1/4 cup molasses
  • 1 tsp vanilla
  • 2 large eggs

Combine flour, pumpkin pie spice, baking soda, ginger and salt in a bowl. Mix well and stir in cranberries.

In a separate bowl, combine brown sugar, butternut squash, buttermilk, veg. oil, molasses, vanilla and eggs. Stir well with a wisk.

Add the squash mixture to the flour mixture and stir until just moist.

Coat muffin pans with baking spray and spoon batter into pan. Makes about 12-18 muffins.

Bake in 400 degree oven for about 15 minutes or until toothpick comes out clean. Remove from pan immediately and cool on a rack.

If there are any left, these do freeze well. They make a great grab-n-go breakfast.

Some of my previous fall squash posts:

Thanks for reading FamilyBalanceSheet. If you don't already receive FBS free updates, please click here to sign up.

This post is linked to:


Monday, August 31, 2009

Zucchini burn-out? The key is variety.

I don't even grow zucchini, we get a lot through our CSA, so I can't imagine how much a home gardener harvests. I try to use it all without overloading my family with stir-fry dishes, like I did a few years ago, when my husband finally said to me, "Please no more zucchini stir-fries".

I bake, saute, grill and quite honestly I'm ready for the end of zucchini season.


I baked two batches of Zucchini basil muffins last week to stick in the freezer. I found the recipe last year at Get Rich Slowly. I use parsley instead of the basil because that is what I have in my garden. These muffins are tasty and will be good in the fall when I start making more soups and chilis.

I don't think a zucchini recipe can get any easier than the Farmers Market squash saute from Kraft. Again, I use parsley instead of the basil, because that is what I grow. I don't know why I have trouble growing basil, it always goes to seed right away for me.

I also make Zucchini Oven chips from Cooking Light magazine. They also are easy to make.

Have you tried my Garden Fresh Frittata and the Chocolate chip zucchini muffins that I wrote about a few weeks ago? I made another batch of the muffins for my freezer this week.

Have you gone through zucchini burn-out yet, or are you still enjoying the season? I promise this is my last zucchini post...until next summer :)

Thanks for reading FamilyBalanceSheet. If you don't already receive FBS free updates, please click here to sign up.

Monday, March 23, 2009

Whole Wheat Pitas

I love to cook and would much prefer to eat something homemade then made from a box. Homemade food tastes better to me and my family and a lot of the time the meals are healthier and less expensive than their store made, processed counterparts. Make It Yourself Monday gives me a chance to experiment with some recipes that I might not have tried before.

Whole Wheat Pitas
This recipe caught my eye in my latest Cooking Light magazine. I buy pitas at the grocery store occasionally, but never considered making them. I was a little intimidated at first; the thought of making my own pitas seemed daunting to me. This recipe for whole wheat pitas was incredibly easy.

I am now hooked. I don't know if I can go back to store bought pitas. The recipe calls for two types of flours: bread and white whole wheat. I didn't have either so I did have to buy both types. You could probably use regular whole wheat flour in place of the white whole wheat if you have the regular on hand. I didn't so I bought the white whole wheat. I will definitely be making these pitas again so the flour will not go to waste.

While the pitas were baking I whipped up a batch of tuna salad and the sandwiches were delicious. My 3 year old liked her pita with some cream cheese and homemade strawberry freezer jelly. She gobbled it up and asked for another.

This recipe is definitely a keeper.

If you enjoyed this article, then you might enjoy some previous "Make It Yourself Monday" articles:

Hummus
pizza dough
granola

Thanks for reading FamilyBalanceSheet. If you don't already receive FBS free updates, please click here to sign up.

This post is linked to:

Monday, March 2, 2009

Pizza Dough

I love to cook and would much prefer to eat something homemade then made from a box. Homemade food tastes better to me and my family and a lot of the time the meals are healthier and less expensive than their store made, processed counterparts. Make It Yourself Monday gives me a chance to experiment with some recipes that I might not have tried before.

We are a pizza-lovin' family, but for some reason we usually order our pizza out. This weekend I decided to try my hand at making pizza dough and found that it was surprisingly easy. I found this pizza dough recipe from Bon Appetit magazine and it was really easy to make. I used my food processor and it did all of the work for me. After the hour it took for the dough to rise, we rolled the dough out on a pizza stone and garnished with mozzarella cheese, fresh tomatoes, broccoli and garlic powder. My 3 year old helped me put the veggies on top. I then baked the pizza in a 475 degree oven for about 15 minutes until the cheese was melted and the bottom was baked through.

Our pizza before the we put it in the oven


Dinner is ready...our homemade pizza was very yummy!!


We all loved our homemade pizza and it didn't cost us $10-$15 that we would have spent from a pizza shop. I had all of these ingredients in my pantry and fridge so it made our "night in" very affordable.

Do you make your own pizza? What are your favorite pizza toppings?

Thanks for reading FamilyBalanceSheet. If you don't already receive FBS free updates, please click here to sign up.