Showing posts with label Recipes - Side Dish. Show all posts

Tuesday, August 6, 2013

Tomato & Cucumber Salad {Fresh from the Garden}


Pin this Recipe on Pinterest

Easy Summer Food doesn't get any easier than this salad. The fresh vegetables and herbs were either from my garden, the CSA, or a neighbor's garden and the rest of the ingredients are staples in my kitchen.

Tomato & Cucumber Salad is fresh, delicious & when from your garden--inexpensive!

Tomato & Cucumber Salad

Ingredients

  • 2 cups halved grape or cherry tomatoes
  • 1 cucumber, chopped, (also, peeled if not organic)
  • ¼ - ½ red onion, cut into thin slices
  • 3 tablespoons feta
  • 3 tablespoons extra virgin olive oil
  • 1 garlic clove, minced
  • 1 tablespoon chopped fresh herbs - use a combination of your favorites: oregano, parsley, thyme, basil
  • 1 tablespoon white balsamic vinegar
  • ¼ teaspoon each salt & pepper

Instructions


1. In your serving bowl, mix together the tomatoes, cucumber, onion, and feta.

2. Combine the evoo, garlic, herbs, vinegar, salt, pepper well and pour over the vegetables. Mix together to coat the veggies well.

3. Allow the salad to marinate in the refrigerator for at least 30 minutes or longer--can be made the day before. The fresh garlic will have a bite to it, but will mellow out the longer it sits in the refrigerator.


Print recipe for Tomato & Cucumber Salad.

This post is linked to Thrifty Thursday.

Thanks for reading. If you would like to receive FREE updates of FBS, there are four ways to do so:
Follow Me on Pinterest

Monday, June 24, 2013

Pasta Salad with Lemon Vinaigrette


Pin This Recipe on Pinterest

I served this lemony pasta salad last week with Red Pepper & Feta Turkey Burgers and fresh fruit. It was delicious and this pasta salad will definitely become a dish that I take to the many pot luck picnics that we are invited to over the summer.

Enjoy!

Pasta Salad with Lemon Vinaigrette

Ingredients


  • 8 oz uncooked bow tie pasta
  • 1 bell pepper, chopped
  • 1 small to medium cucumber, chopped
  • 1 small head of broccoli, chopped
  • 1 pint cherry or grape tomatoes, halved
  • 1 bunch spring onions, chopped
  • 1 lemon
  • ¼ cup parsley leaves
  • 2-3 garlic cloves
  • ⅓ cup extra virgin olive oil
  • pinch salt & pepper

Instructions


1. Cook the pasta according to the box instructions. Drain, rinse with cold water to cool down. Drain well. Place in large bowl

2. Add the pepper, cucumber, broccoli, tomatoes, and onions to the cooled pasta.

3. Zest & juice the lemon and place in a mini food processor along with the parsley, garlic, evoo, salt & pepper. Run the processor until the vinaigrette is smooth.

4. Pour vinaigrette over the pasta salad and mix well. Refrigerate for 2 hours or up to a day ahead.

Print recipe for Pasta Salad with Lemon Vinaigrette.

Pasta Salad with Lemon Vinaigrette goes well with:

This post is linked to Weekend Potluck.


Thanks for reading. If you would like to receive FREE updates of FBS, there are four ways to do so:
Follow Me on Pinterest

Tuesday, April 9, 2013

20 Ways to Cook Asparagus


Pin this post on Pinterest

There are so many reasons to love spring and the fact that asparagus is in season in one of them. This is the best time of year to buy & eat asparagus, so I take full advantage of the season. The price is usually fairly cheap too as I often find it on sale for $1.49/pound at this time of year.

20 Ways to Cook Asparagus

  1. Lemony Chicken Asparagus Stir Fry at Family Balance Sheet
  2. Ham & Asparagus Frittata at Family Balance Sheet
  3. Ham & Asparagus Risotto at Family Balance Sheet
  4. Asparagus & Basil Pesto at Simple Awesome Cooking
  5. Asparagus Hummus at Cookin' Canuck
  6. Cherry Tomato & Asparagus Salad at Sunset
  7. Curried Quinoa & Asparagus Salad at the Clever Carrot
  8. Martha Stewart's Asparagus Custard Tart (Reduced Calorie) at Virtually Homemade
  9. Bacon Asparagus Strata at Key Ingredient
  10. Beer Battered Asparagus at Epicurious
  11. Cauliflower Asparagus Semolina Cakes at Haniela's
  12. Cream of Asparagus Soup at Aunt Clara's Kitchen
  13. Crustless Asparagus Quiche at Skinny MS.
  14. Herbed Cheese Asparagus Crostini at Home Cooking Memories
  15. Linguine with Asparagus & Egg at Martha Stewart
  16. Meyer Lemon Garlic Shrimp & Asparagus with Brown Rice at Daily Dish Recipes
  17. Roasted Asparagus with Parmesan at Family Balance Sheet
  18. Roasted New Potatoes & Asparagus at Cinnamon Spice & Everything Nice
  19. Scrambled Eggs with Asparagus at What Should I Eat for Breakfast Today
  20. Slow Cooker Cheddar Potato & Asparagus Soup at Little Kitchen, Big Bites

What's your favorite way to cook (and eat) asparagus? Let us know in the comments.

Thanks for reading. If you would like to receive FREE updates of FBS, there are four ways to do so:
Follow Me on Pinterest

Friday, August 24, 2012

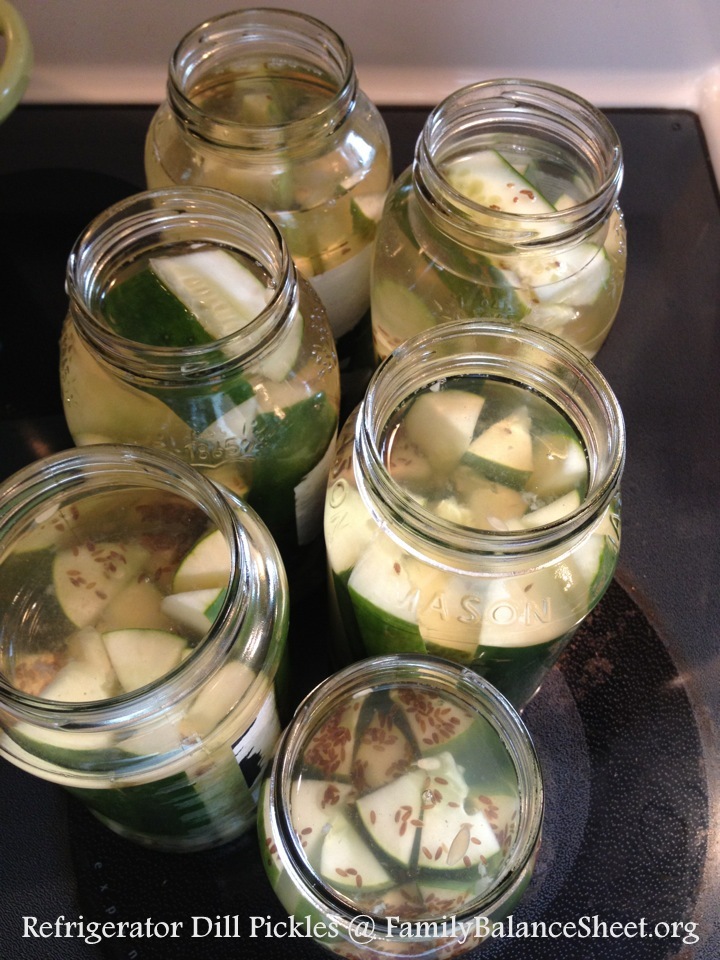
Refrigerator Garlic Dill Pickles

I received a bunch of cucumbers from our CSA--too many to eat in salads--so I made refrigerator garlic dill pickles. I found the recipe on the farm's website. They turned out very tasty and the longer they stay in the refrigerator the more garlicky the flavor!


Refrigerator Garlic Dill Pickles

recipe from Spiral Path Farm

Ingredients

  • 6-8 large, firm cucumbers, cut into spears
  • 2 quarts water
  • 1 cup vinegar
  • 2 tablespoons dried dill seed
  • 1/2 cup coarse salt
  • 2 tablespoons sugar
  • 6-8 whole garlic heads, peeled and papery skin removed
  • 6-8 fresh grape leaves (optional - for crispness. I didn't use.)
  • 6-8 clean glass jars, I reused spaghetti sauce jars.

Directions

1. Soak cucumber spears in an ice bath for 10 minutes. This will help improve crispness.


2. Prepare the brine: In a large sauce pot, bring the water, vinegar,  dill seed, salt, and sugar to a boil. Simmer 5 minutes. Allow to cool to room temperature.


3. While the brine is simmering, place the following in each empty jar: 1 minced clove of garlic, whole cloves of 1 head of garlic, 1 fresh grape leaf. Next, stuff the cucumber spears into each jar.

4. After brine has cooled, pour brine over the cucumbers, covering by 1/2 inch. Place cap on jar and let sit at room temperature for 2 days. Move to the refrigerator for up to a year.


Note - If your cucumbers are not crisp before you pickle them, they will not be crisp afterwards. Some of my pickles are mushy, but the center of some of the cucumbers wasn't firm. Taste wise the pickles are still good, just a little mushy. Be sure to use FIRM cucumbers!

Do you make your own pickles? What's your method? Let us know in the comments.

Thanks for reading. If you would like to receive FREE updates of FBS, there are four ways to do so:
Follow Me on Pinterest

This post is linked to Real Food Wednesday @ Kelly the Kitchen Kop and Your Green Resource at The Greenbacks Gal.

Monday, October 3, 2011

Cranberry Walnut Acorn Squash Bowls

I love the flavors of fall: apples, clementines, pears, pumpkins, and fall squashes. We usually receive a few fall squashes with our CSA share and this is one of our favorite ways to eat acorn squash.

1. You'll need a sharp chef's knife to cut through these little buggers. I cut the stem off first and then cut the squash in half lengthwise. Be very careful.


2. Scoop out the seeds of the squash. In the cavity of each half, place:
  • 2-3 teaspoons butter
  • 1/4 teaspoons cinnamon
  • 1-2 Tablespoons brown sugar
  • 2 Tablespoons dried cranberries
  • 2 Tablespoons chopped walnuts


3. Place in a casserole dish. Add 1/2 C water to the bottom of the casserole dish. Cover with foil and bake for one hour at 350 degrees.


After baking, mix together the flesh and the ingredients within the acorn "bowl" and enjoy.


Thanks for reading. If you would like to receive FREE updates of FBS, there are four ways to do so:
Follow Me on Pinterest

This post is linked to Real Food Wednesday at Kelly the Kitchen Kop and The Mommy Club Solutions and Resources at Crystal and Co and $5 Dinners and the Ultimate Recipe Swap at Life as MOM.

Monday, September 12, 2011

Tomato, Zucchini & Rice Bake


This side dish is a great way to use up your garden vegetables. My whole family enjoyed it. The recipe came with our CSA box of vegetables last week. The temperature dropped around here, so I turned on my oven after a long, idle summer.

Play around with the spices and try different combinations. The next time I make this, I'm going to use Italian spices for a different twist.

Tomato, Zucchini & Rice Bake
  • 1 Cup long grain brown rice, uncooked
  • 1 T olive oil
  • 1 tsp ground ginger
  • 1 medium red onion, chopped
  • 2 summer squashes (zucchini and/or yellow), chopped
  • 3 large tomatoes, chopped
  • 2 garlic cloves, minced
  • 1-2 Tbsp soy sauce
  • 2 Cups homemade chicken stock or vegetable broth, boiling
Preheat oven to 350 degrees.

Heat olive oil in a large skillet. Add uncooked rice and saute until golden brown.

Place rice in a 13 X 9 casserole dish and spread the rice out evenly. The rice will also grease the pan. Sprinkle the ginger over the rice.

Layer the onions, squash and tomatoes over the rice.

Combine the garlic, soy sauce and broth. Pour the mixture over the rice and vegetables.

Cover tightly with foil and bake for 1 hour and 15 minutes, or until the broth is absorbed.

Print recipe for Tomato, Zucchini & Rice Bake.

Thanks for reading. If you would like to receive FREE updates of FBS, there are four ways to do so:


This post is linked to $5 Dinner Challenge.

Thursday, May 26, 2011

Picnic Planning for Memorial Day and Beyond

Grills will be firing up this weekend to kick off summer with Memorial Day.

Do you need some inspiration for your picnic menu? Let me help you out.

The Main Course
Red Pepper & Feta Turkey Burgers


Apple and Blue Cheese Feta Burgers


How to Grill Chicken Breast and Not Dry It Out Like the Sahara


Grilled Garlic Lemon Shrimp


Grilled Salmon with Peach Mango Salsa


Grilled Sausages with Peppers and Onions Hobo Pack


Super Side Dishes
Purple Cabbage & Broccoli Slaw


Black Bean, Tomato & Feta Salad


Watermelon & Feta Salad


Grilled Garlic Rosemary Red Potatoes


Delicious Desserts
Grilled Peaches with Homemade Whipped Cream


Chocolate Whoopie Pies


Homemade Brownies with Homemade Whipped Cream


What is on your menu for this weekend? Let us know in the comments. Have a wonderful, relaxing and safe holiday weekend!
http://www.blogger.com/img/blank.gif

Thanks for reading. If you would like to receive FREE updates of FBS, there are four ways to do so:


This post is linked to Tasty Tuesday at Balancing Beauty and Bedlam

Monday, May 2, 2011

Mediterranean Orzo Pilaf

This is a re-post from 2009. Enjoy!


The first time I had Rice-a-Roni was in college when my roommate made it for me. I thought she was a gourmet cook when she added chicken to the rice while it cooked and voila...chicken and rice dinner. Wow, I was so impressed. I didn't know a thing about cooking back then and I didn't have an interest to cook either. But I made that chicken and rice dinner many times after that thinking I was really cooking.

Fast forward many, many years and I love to cook and most of the time it is from scratch. I haven't eaten Rice-a-Roni in many years, but when I made this Mediterranean Orzo Pilaf, it reminded me of the Rice-a-Roni. Although, this dish is made with fresh tomatoes and spinach, feta and Kalamata olives, not dried powder.

Mediterranean Orzo Pilaf
adapted from San Giorgio

Ingredients:
  • 2 tablespoons olive oil
  • 2 garlic cloves, minced
  • 8 oz. uncooked orzo - (my box was 16 oz, so one box will make two batches)
  • 2-1/4 cups homemade chicken stock or store bought
  • 1/2 teaspoon dried Italian seasoning
  • 1 cup chopped fresh tomato
  • 1 cup fresh spinach, cut into thin strips
  • 2 tablespoons finely chopped Kalamata olives
  • 1/2 cup crumbled feta cheese

1. Heat oil in large skillet over medium heat, add garlic and orzo. Cook, stirring frequently, until orzo turns golden brown, about 3 minutes.

2. Stir in stock and seasoning and bring to a boil. Reduce heat and simmer uncovered for 10 minutes.

3. Stir in tomato and spinach. Cover to wilt spinach. Cook 5 minutes or until almost all liquid is absorbed. Continue to stir occasionally to prevent sticking.

4. Remove from heat and add olives and feta. Stir to combine.

Thanks for reading. If you would like to receive FREE updates of FBS, there are four ways to do so:

Monday, March 21, 2011

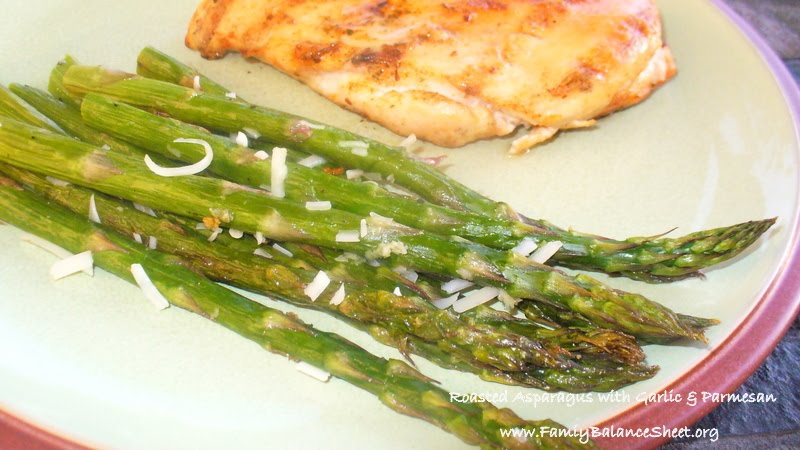
Roasted Asparagus with Garlic and Parmesan


One of my favorite things about spring is asparagus. We eat a lot of it this time of year, because of the specials I find, like the 99 cents a pound deal I got last week. My favorite way to eat it is roasted and it makes for an easy and delicious side dish.

Roasted Asparagus with Garlic and Parmesan
  • 1 lb asparagus, cleaned, dried and the thick ends trimmed
  • 2 garlic cloves, minced
  • 1 Tbsp olive oil
  • 1/2 tsp salt
  • 1/4 tsp pepper
  • 1 Tbsp grated Parmesan cheese
Place asparagus flat on rimmed baking sheet. Drizzle with olive oil and garlic and mix together until completely coated. Sprinkle salt and pepper.


Bake at 400 degrees for 10-12 minutes, until fork can pierce through and the asparagus is bright green. Remove from oven. Sprinkle with Parmesan cheese. Enjoy!


Roasted Asparagus goes well with:


Thanks for reading. If you would like to receive FREE updates of FBS, there are four ways to do so:

Monday, January 31, 2011

Smashed Garlic Parmesan Potatoes


I also call these Lazy Garlic Parmesan Potatoes, because I leave the skins on. To be honest, I don't think I have ever peeled a potato.

Smashed Garlic Parmesan Potatoes
  • 2 lbs Yukon Gold potatoes, cleaned, skins can be left on, cut into quarters
  • 2-3 garlic cloves
  • ¼ Cup Parmesan
  • 2-4 Tbsp. sour cream
1. Place the potatoes and garlic in a large soup pot and cover with water, at least 1 inch above the potatoes. Cover and bring to a boil. Add the salt. Reduce heat to a simmer and cook until a fork can pierce easily through potato. About 30 minutes.

2. Carefully strain potatoes from water, but reserve about a cup of the potato water.

3. Place cooked potatoes and garlic in a large bowl, add a couple of tablespoons of sour cream, ¼ cup Parmesan and a couple of tablespoons of potato water and smash using a potato smasher. Add more sour cream and potato water to get to your desired consistency.

Tip - Rinse the potato smasher right away. It is not an easy tool to clean once the potatoes have dried.

I love Smashed Potatoes with pan sauce or gravy. On this night I served the smashed potatoes with Chicken Stuffed with Sun-Dried Tomatoes, Spinach and Feta. But the potatoes are just as delicious without gravy and go very well with Turkey and Veggie Loaf. With these smashed potatoes as a side dish, the menu possibilities are endless.

Print this recipe.

If you would like to receive FREE updates of FBS, there are four ways to do so:
This post is linked to:

Monday, December 6, 2010

Cooking with Hakurei White Turnips


Prior to a few weeks ago, I had never cooked with turnips. I most certainly never bought them in the grocery store; I never ever considered it. I never gave turnips a thought.

But a few weeks ago, we received turnips in a couple of our weekly shares from our CSA. They weren't just any turnips, they were Hakurei White Turnips. After some web investigation, I found that these turnips were called "salad turnips" and were best eaten raw.

I cut a small one up to try. It was crunchy, slightly earthy, but I couldn't just eat it raw, so I added it to a few recipes in my repertoire.

I replaced the radish (pictured below) in my Radish Canapes with a thin slice of turnip. Not a bad little afternoon snack. I like this snack with dill.


I ran the radishes through the food processor and added them to my Purple Cabbage and Broccoli Slaw. Honestly, I couldn't even taste them with all of the other veggies in the salad, so if you are a little unsure about turnips this is a great way to mask them when eating raw.


Finally I cooked them with garlic and potatoes and made Smashed Garlic Potatoes & Turnips. Apparently, these turnips are best eaten raw, but these smashed potatoes were delicious and so easy to make.

In a large soup pan, add 2 lbs. potatoes, 2 large turnips, 3-4 garlic cloves and cover with water. Bring to a boil and add 2 Tbsp salt. Reduce to a simmer and cook for 20-30 minutes until soft. Reserve a cup of the water and set aside. Drain the rest of the water. With a potato masher, add enough potato water and/or sour cream and smash the potatoes until you get your desired consistency.


Do you like turnips? What is your favorite way to eat them?

If you would like to receive FREE updates of FBS, there are four ways to do so:

This post is linked to:

Monday, November 29, 2010

Roasted Rosemary and Garlic Potatoes


This is quite possibly my most favorite side dishes. It goes great with so many sandwiches, like Red Pepper and Feta Turkey Burgers, Turkey and Veggie Sloppy Joes and Pulled Chicken BBQ Sandwiches.

French fries are a weakness of mine, buy I don't like frozen french fries. These simple roasted potatoes taste so much better. My favorite potato to use is the Yukon Gold and it is the only potato I buy. It has a creamier texture than other potatoes.

Roasted Rosemary and Garlic Potatoes
  • 1 1/2 lbs potatoes, about 5 cups chopped into bite-sized pieces
  • 1 Tbsp chopped fresh Rosemary
  • 2-3 garlic cloves, minced
  • 1/2 tsp salt
  • 1/4 tsp pepper
  • olive oil

Mix the potatoes, Rosemary, garlic, salt and pepper together in a large bowl.

Drizzle with olive oil until well coated.

Spread flat on a large rimmed baking sheet.

Bake at 400 degrees for about 20 minutes or until your desired crispiness.

Enjoy.

Thanks for reading FamilyBalanceSheet.

If you would like to receive FREE updates of FBS, there are four ways to do so:


This post is linked to:

Tuesday, November 16, 2010

How To Make Turkey Gravy

Welcome to Turkey Week at Family Balance Sheet. We will be thawing, roasting, making gravy and stock and of course eating. Enjoy!

This recipe serves 4-6 people. Adjust the ingredients to make more gravy for a larger crowd.

After your roasted turkey has cooled to slightly, move it to another pan/tray to finish resting and to carve.

Remove all but 3 Tbsp of turkey fat from roasting pan, leave any brown bits in pan.

Place roasting pan over 2 burners and heat both burners to medium. I used a front and back burner and it worked out well. If you are not comfortable with cooking the gravy this way, simply use a sauce pan, just be sure to scrap as much of the brown bits into the pan. That is where so much flavor comes from.

Add 3 Tbsp flour to the fat and whisk together to prevent burning and to form a paste, about 2 minutes. Mixture will bubble.


Add 1 1/2 Cups turkey stock and 1/2 Cup white wine. If you do not have wine, replace with stock. You can use chicken stock if you don't have turkey stock.

Continue whisking, scraping the bottom of pan and bring to a boil until gravy thickens, about 3 minutes.


To remove any brown bits, pour gravy through a fine sieve, buthis is not necessary.

Serve with your favorite Roasted Turkey and all of the fixins'.


Enjoy all of the posts from Turkey Week 2010:

Thanks for reading FamilyBalanceSheet.

If you would like to receive FREE updates of FBS through your RSS Feed, please click here to sign up. Or Subscribe by Email.

Monday, November 8, 2010

Purple Cabbage and Broccoli Slaw


Crunchy, colorful, healthy and tasty.

Purple Cabbage and Broccoli Slaw
  • 1 small purple cabbage or half of a medium purple cabbage
  • 2 Cups baby carrot
  • 1/2 red onion
  • 1 medium head of broccoli, I cut most of the stalk off and use the florets
  • 1/2 Cup dried cranberries
  • 4 Tbsp sugar
  • 1/2 tsp salt
  • 1 tsp celery seed
  • 2 Tbsp white balsamic vinegar
  • 6 oz container of plain yogurt, I used low-fat
  • 1/4 Cup slivered almonds
Using a food processor, shred the cabbage, carrots, red onion, broccoli. Toss together along with the cranberries in a big bowl.

Mix together the sugar, salt, celery seed, vinegar and yogurt.

Combine the yogurt mixture with the vegetables. Top with almonds.

Refrigerate until ready to eat.

This slaw goes great with Turkey Veggie Sloppy Joes or Red Pepper and Feta Turkey Burgers or Apple and Blue Cheese Turkey Burgers.


Thanks for reading FamilyBalanceSheet. If you would like to receive FREE updates of FBS through your RSS Feed, please click here to sign up. Or Subscribe by Email.

This post is linked to:


Monday, September 27, 2010

Black Bean, Tomato & Feta Salad


This is a delicious and easy salad to throw together.

Black Bean, Tomato & Feta Salad

  • 1 can (15 oz) of black beans, rinsed and drained
  • about 3 cups cherry or grape tomatoes, sliced
  • 1 cucumber, chopped into small pieces
  • 1-2 Tbsp chopped fine Parsley
  • 1/2 red onion, chopped fine. You could also chop up a bunch of spring onions
  • 1/2 Cup Feta
  • 3 Tbsp extra virgin olive oil
  • 1 Tbsp lemon juice
  • 1 garlic clove, minced
  • pinch of salt

Combine the beans, tomatoes, cucumber, parsley, onion and feta in a bowl. In a separate bowl, whisk together the oil, lemon juice, garlic and salt to make a vinaigrette. Pour the vinaigrette over the vegetables and stir together. Serve with your favorite grilled meat and some fresh fruit.

One side note: This salad is served best the first day. If there are left-overs for the next day, you might want to pour the salad through a strainer right before eating, because it gets soupy. It tasted fine the second day, but there was a lot of liquid on the bottom of the bowl.

Thanks for reading FamilyBalanceSheet.

If you would like to receive FREE updates of FBS through your RSS Feed, please click here to sign up. Or Subscribe by Email.

This post is linked to:

Monday, September 6, 2010

Watermelon and Feta Salad

I wish I could take responsibility for this beauty, but it came in our weekly share from our CSA. This melon was a gorgeous red and it was sweet and delicious.


I can take responsibility for this dish though.


Watermelon and Feta Salad

  • 3 Cups chopped watermelon
  • 1/2 Cup chopped feta
  • 1-2 jalapenos, chopped fine - depending on your heat tolerance. Remove seeds if your heat tolerance is low.
  • 1/2 red onion, chopped fine
  • juice of 1/2 lime
  • 2 Tbsp chopped fresh herb, like pineapple sage, mint, parsley or cilantro
  • pinch of salt

Combine all of the ingredients in a bowl.

I served the Watermelon and Feta Salad with grilled chicken. You could eat the salad like a salsa with your favorite tortilla chips too!

Enjoy!

Thanks for reading FamilyBalanceSheet.

If you would like to receive FREE updates of FBS through your RSS Feed, please click here to sign up. Or Subscribe by Email.

This post is linked to: