Monday, December 20, 2010

White Chip Orange Dream Cookies


If you are looking for a different variation of a chip cookie, this may be for you. I got this recipe many years ago at a cookie exchange. These cookies are almost better the next day when the orange flavor settles in. Enjoy!

White Chip Orange Dream Cookies
  • 2 1/4 cups flour
  • 3/4 tsp baking soda
  • 1/2 tsp salt
  • 1 cup butter, softened
  • 1/2 cup sugar
  • 1/2 cup packed light brown sugar
  • 1 egg
  • 3 tsp grated orange peel
  • 1 package (12 oz) white chips - I used Nestle Premier White morsels

Combine flour, baking soda and salt in a bowl and set aside.

Beat butter, sugar and brown sugar in a large mixing bowl until creamy.

Beat in the egg and orange peel.

Gradually add the flour mixture and stir until just combined.

Stir in the chips.

Bake in a preheated 350 degree oven for 10-12 minutes.


If you would like to receive FREE updates of FBS, there are four ways to do so:

Thursday, December 16, 2010

My Most Special Christmas Ornament


In 1980, when I was 11 years old...okay did I just admit my age...anyway, my great-grandmother, known as Grammy, handmade me this crocheted Christmas ornament.

My Grammy was a crafter, seamstress, and crocheter and she always made her gifts. I still have the clothes that she made for my Barbie dolls when I was a young girl. Unfortunately the crafty gene didn't trickle down to me. I think it stopped at my mother.

Every year when I take out this ornament, I think of her. It is my most favorite Christmas ornament. I am so glad I heeded my mother's advice and kept the handwritten gift tag. This ornament takes a special place towards the top of our tree, so little, inquiring hands can't reach it.


...and yes, that is a fake tree in the background...

What is your most special Christmas ornament? Let us know in the comments.


If you would like to receive FREE updates of FBS, there are four ways to do so:

This post is linked to:

Wednesday, December 15, 2010

Twas Ten Days Before Christmas and My House is A Wreck

What moron schedules a major home improvement project 2 weeks before Christmas?


Oh, I guess that would be me. It seemed like a good idea 2 months ago when we scheduled the project. "It will be done in time for Christmas", we thought.

GRRRRRRR...I didn't factor in all of the cleaning that would need to be done after the project was complete.


Double GRRRRRRRRR......

If you would like to receive FREE updates of FBS, there are four ways to do so:

Tuesday, December 14, 2010

What Type of Christmas Shopper Are You?


Do you shop all year round? Does your shopping begin at 4am on Black Friday? Or do you wait until December 20 to even start?

My husband and I just sat down together last week to go over our gift list. For some reason, we are 'fly by the seat of our pants' type people.

We spend about the same amount on each person on our list every year and we have money set aside, but as far as the shopping goes, we have a lot to do.

I did a little bit on Black Friday weekend and that was mostly in the comfort of my home, in front of my computer.

We'll be busy over the next week and a half, but we'll get it done. And next week I'll say to myself, "I really need to do more through out the year". But next December, I'll be in the same place, with less than two weeks to go and a lot of shopping to do.

What kind of Christmas shopper are you?

If you would like to receive FREE updates of FBS, there are four ways to do so:

About the photo: That is not my home, I don't have a creative or decorative bone in my body. That display was at a local gift shop last year and I thought it was festive and cute.

Monday, December 13, 2010

Gingerbread Men Cookies ~ A Fun Holiday Activity for Kids


Tis the cookie season and the first batch we made this year was Gingerbread Men cookies. I wasn't sure how my girls would like them, but I knew they would enjoy making and decorating them.

I have been looking for inexpensive Christmas activities to do with the kids for the month of December. This idea came to me as I was leafing through a holiday magazine. I knew my kids would enjoy decorating the cookies.

I didn't own a gingerbread man cookie cutter, so I bought one at Michael's where coupons are abundant.

I used this simple recipe to whip up the batter, although there was a four hour gap between making the dough and baking because the dough had to be refrigerated. My oldest had a hard time understanding that since all she wanted to do was decorate the cookies.

Finally it was time to cut and bake the cookies. I have a hard time with a rolling pin most times, but this dough was easy. It just needed a lot of extra flour and to be kept cold.

It was finally time to decorate. I used this recipe for the royal icing. It does call for an ingredient that I didn't have: Meringue powder. I found it at Michael's and used a coupon. The icing was so easy to use that I will probably use this recipe for our Gingerbread houses that we are going to decorate next week, so this powder will not go to waste for me.

I used sandwich bags to pipe the icing, which was easy for little hands to maneuver.


We topped the cookies with M&Ms, which was probably my baby's favorite part. One for her, one for the cookie, one for her, one for the cookie...


My kids and I had a lot of fun making these cookies and in the end we all enjoyed eating them too.

Do you make Gingerbread cookies at this time of year? What do you use to decorate them?


If you would like to receive FREE updates of FBS, there are four ways to do so:

This post is linked to:

Thursday, December 9, 2010

Long Term Storage of Flour


Have you taken advantage of the flour deals that have been going on since Thanksgiving? I bought a few packages around Turkey Day for about $1.50, but this week Wegmans was offering their store brand flour for 99 cents for the 5 lb bag and the unbleached was included. I thought that was a fantastic deal so I picked up my customer limit of 2 and my mom gave me her limit of two. I now have 4 bags of flour and my Tupperware flour container is full.


I'm not sure how long it will take for me to use all of that flour and the date on the flour is about a year away. I have never stockpiled this much flour, but I am having a love affair with my book, Artisan Bread in Five Minutes a Day: The Discovery That Revolutionizes Home Baking and I am going through the flour much quicker than usual.

I read online that you should freeze the flour for about 2 days to kill off any bugs and then store in an air-tight container. Bugs in the pantry are not a good thing. I had an infestation one summer and I had to get rid of every single dry good item in my pantry that wasn't in an air-tight container. So the flour bags are at risk. So here's my predicament, I need to find some type of air-tight container large enough to store the flour in so that it stays fresh longer and I don't get any bugs.

I love my Tupperware containers. I'm not sure what era they are from, but I find them at yard sales or thrift stores. I have more in other cupboards. I store everything from popcorn and snacks to all of my baking supplies like sugars and flours. But I need to come up with a bigger container or storage idea for the 4 bags of flour that I have right now.

So I am on a quest for a large, inexpensive, air-tight, food-grade container. Do you have any suggestions? If so, please let us know in the comments.

Do you stock-pile flour or other dry goods? How do you store them?


If you would like to receive FREE updates of FBS, there are four ways to do so:


Disclosure: I am an Amazon Associate, and if you make a purchase through my link, I earn a small percentage--at no cost to you! Thanks for supporting Family Balance Sheet.

Tuesday, December 7, 2010

"This Was the Best Day Ever"

Our Sunday went like this:
  • Church
  • Head to Lowes to pick out a new toilet and bathroom vanity for our half bathroom
  • Stop for a quick lunch at our favorite Mexican restaurant
  • Head home to change clothes, put youngest down for a nap, while my oldest and I go to a birthday party of one of her school friends. I stayed at the party.
  • After party, rush home for quick dinner of leftovers and get dressed to go back to church
  • Go back to church for the Children's Christmas musical where our oldest daughter sang a song in the Pre-K choir. Followed by a cookie party in the church gym.
  • Back home and put kids to bed about an hour and a half past bedtime.
When we walked in the house after the church musical, I realized the cleaning fairies didn't get the memo to clean up while we were gone. The day was such a rush that the breakfast dishes AND the dinner dishes were still in the sink, the dishwasher was still sitting full of clean dishes that were never put away, beds weren't made and the Sunday paper was spread out all over the living room. Our Sundays are not usually that hectic and I think I was home for one hour total from the time we left for church in the morning to the time we got back from the musical.

I was a bit distressed about the state of the house, but as I was tucking in our oldest daughter, who had just sang for the first time in front of a large audience, she said to me, "this was the best day ever".

"Oh yeah, why was that?", I asked.

"Because my dream came true. I always wanted to sing in front of people just like Hanna Montana.", she replied rather dreamily.

And with that, I kissed that beautiful little face good night and decided that the dishes in the sink could wait one more day.

If you would like to receive FREE updates of FBS, there are four ways to do so:

Monday, December 6, 2010

Cooking with Hakurei White Turnips


Prior to a few weeks ago, I had never cooked with turnips. I most certainly never bought them in the grocery store; I never ever considered it. I never gave turnips a thought.

But a few weeks ago, we received turnips in a couple of our weekly shares from our CSA. They weren't just any turnips, they were Hakurei White Turnips. After some web investigation, I found that these turnips were called "salad turnips" and were best eaten raw.

I cut a small one up to try. It was crunchy, slightly earthy, but I couldn't just eat it raw, so I added it to a few recipes in my repertoire.

I replaced the radish (pictured below) in my Radish Canapes with a thin slice of turnip. Not a bad little afternoon snack. I like this snack with dill.


I ran the radishes through the food processor and added them to my Purple Cabbage and Broccoli Slaw. Honestly, I couldn't even taste them with all of the other veggies in the salad, so if you are a little unsure about turnips this is a great way to mask them when eating raw.


Finally I cooked them with garlic and potatoes and made Smashed Garlic Potatoes & Turnips. Apparently, these turnips are best eaten raw, but these smashed potatoes were delicious and so easy to make.

In a large soup pan, add 2 lbs. potatoes, 2 large turnips, 3-4 garlic cloves and cover with water. Bring to a boil and add 2 Tbsp salt. Reduce to a simmer and cook for 20-30 minutes until soft. Reserve a cup of the water and set aside. Drain the rest of the water. With a potato masher, add enough potato water and/or sour cream and smash the potatoes until you get your desired consistency.


Do you like turnips? What is your favorite way to eat them?

If you would like to receive FREE updates of FBS, there are four ways to do so:

This post is linked to:

Thursday, December 2, 2010

Cookbook Ideas for the Foodie On Your Gift List


Are you looking for some gift ideas for the foodie or cook on your gift list? These cookbooks are sure to please.
  • During the spring and summer, we grill A LOT. When my grilled chicken kept coming out too dry, I turned to Bobby Flay's Grill It!. He also inspired me to grill fruit, for which I am eternally grateful.
  • My husband gave me, Artisan Bread in Five Minutes a Day: The Discovery That Revolutionizes Home Baking, for Christmas last year with a message from him on the inside saying, "I will LOVE everything you make in this book. You enjoy, cuz if I do I'll be 300 lbs." Well we are enjoying and he hasn't gained 300 pounds, but this is an addicting book. The "5 minutes" part comes after a bit of prep work. There is a master recipe that is easy to mix up, but it needs a few hours of rising before it can be baked. What's nice about the method in this book is that there is no kneading required and after rising, the dough is ready to bake and it can be stored in the refrigerator for up to 14 days. The main recipe bakes 4 loaves of bread. When you are ready to bake, pull and cut off a piece of dough and shape it into a loaf. Let it rise for 20 minutes and then bake. No more buying specialty loaves of bakery fresh bread, because you can now make it in your kitchen for a fraction of the store-bought cost. I feel like I have mastered the main recipe and I'm ready to elaborate with other variations offered in the book, such as Olive bread, calzones, flat breads, focaccias and pizzas. Okay, so maybe 300 pounds isn't so far off for us, but it will be worth every baked fresh bite.
  • Speaking of 300 pounds, Martha Stewart's Baking Handbook is the most fun baking book to look through and bake through. You'll have a hard time figuring out what to bake first, second or third. Whether sweet or savory, there is so much to choose from: pies, cakes, cookies, brownies, bars, tarts, tortes, and so much more. Next on my list to bake is the Coconut Cream Pie or wait, maybe the Key Lime Tart. Oh, but the Cherry Streusel Coffee Cake looks amazing too.
  • I fell in love with The Pioneer Woman a few years ago. She is a city girl who married a rancher and is now a homeschooling mom and owner of the mega-popular blog, Pioneer Woman. Her book, The Pioneer Woman Cooks: Recipes from an Accidental Country Girl, will make your mouth water with dishes like BBQ Jalapeno Poppers, Maple Pecan Scones, Perfect Pot Roast, Patsy's Blackberry Cobbler and Simple, Perfect Enchiladas. She is also a skilled photographer and shot all, but a few of the pictures in the book.
  • I did not always love to cook. I loved to eat good food, but only if someone else was preparing it. I started really cooking five years ago when I became a mom. It was then that I discovered Ina Garten, aka, Barefoot Contessa on the Food Network. It was Ina who inspired me to roast a chicken and to make my own chicken stock, although I use a different method now. But her simple style gave me the confidence to try it. She is a real food cook who has the most fabulous home and kitchen in the Hamptons. Her dishes are sophisticated, but easy to prepare and made with everyday ingredients. I have two of her books, Barefoot Contessa Back to Basics: Fabulous Flavor from Simple Ingredients and Barefoot Contessa at Home: Everyday Recipes You'll Make Over and Over Again. The titles of the books pretty much sum up her cooking style. Some of my favorite dishes are the Roasted Butternut Squash soup with Curry Condiments and Spring Green Risotto.
  • For my birthday, my husband gave me Nourishing Traditions: The Cookbook that Challenges Politically Correct Nutrition and the Diet Dictocrats by Sally Fallon with Mary G. Enig, Ph.D. After several months, I am still pouring through it. It is so densely packed with information and recipes that my head is spinning, BUT it is also changing how I am looking at food, how I cook and our diet. This is not just a cookbook, but a book that will make you re-think your eating habits. This book kicks the Standard American Diet to the curb and looks back at how our ancestors ate. Real food, real fat, real ingredients.
  • My next book was actually one of the first cookbooks my husband ever bought me. We were at a church thrift sale and he found it on the $1 table. It is Moosewood Restaurant New Classics and it is a vegetarian cookbook. At the time we found it, we were dabbling in vegetarianism, but we have since gone back to eating meat. However, I do refer to it when I need inspiration for the produce we receive from our CSA. Aside from a few seafood recipes, the book is primarily vegetarian.

Hopefully you find some gift ideas for the foodie on your list. You also get a glimpse at the cookbooks that inspire me in my kitchen.

If you would like to receive FREE updates of FBS, there are four ways to do so:

Disclosure: I am an Amazon Associate, and if you make a purchase through my link, I earn a small percentage--at no cost to you! Thanks for supporting Family Balance Sheet.

Tuesday, November 30, 2010

Seven Inexpensive or FREE Holiday Activities


We want the holiday season to be festive and memorable for our family, not stressful and expensive. These activities will put you in the festive spirit and won’t break your budget.

1. Go to a local parade.
Check your local newspaper, municipality websites for the dates and times. And be sure to bundle up...unless you live in Arizona or Florida.

2. Host a cookie swap with your friends, family or neighbors.
Invite your friends and/or family over for hot chocolate. Ask everyone participating to make a dozen cookies for each participant. If a dozen is too much, make it a half-dozen. Cookies usually freeze really well, so don't be afraid of ending up with all of these cookies. Make sure to set guidelines in case there are food allergies or issues.

3. Drive through neighborhoods to check out the festive lights.
When I was a child, there was one house that appeared to have thousands of lights and holiday displays. Cars would be parked along side the road to see the display. As a kid, it was magical and I still love to drive around to see the beautiful lights, although I have no desire to decorate our home to that extent.

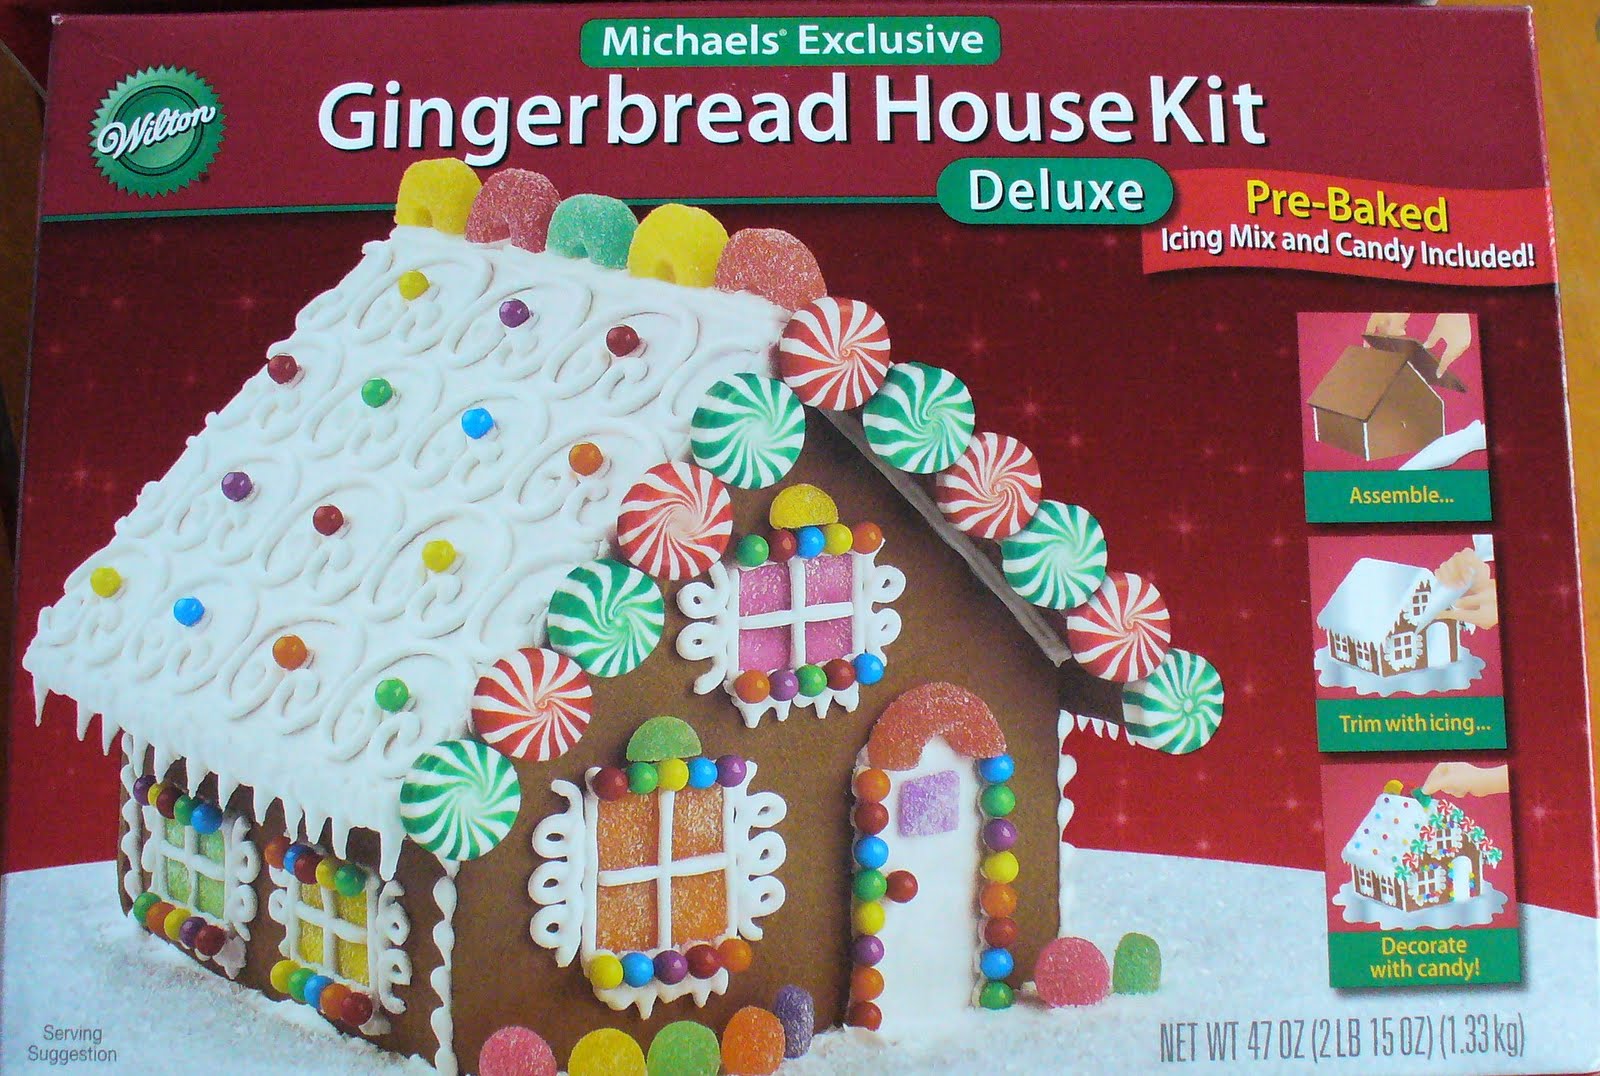
4. Build and decorate a gingerbread house.
Building a gingerbread house is my daughters' favorite holiday activity. I found a kit on sale for $7.99 at a craft store and I was able to use an additional 30% off coupon. At that price, I bought two and my younger daughter could decorate her own and not upset my more meticulous older daughter. You could also make your own gingerbread house, but I found the kit to be easy and less time-consuming.


5. Check your library for holiday themed story times or programs.
Every year, our library has a special Gingerbread Man story time where the children listen to gingerbread themed stories and decorate a cookie.

6. Attend a local church program or musical.
Our church hosts two musicals. One is presented by the children and a second musical for put on by the choirs and musicians in our church. They are always well run productions with a beautiful and inspiring message. For my family, this helps us remember the meaning of the season. If you are not a member of a church, a lot of churches host beautiful holiday programs and they are usually open to the public.

7. Celebrate with a holiday movie night.
There are so many wonderful holiday movies on TV that you could have several movie nights. Make it special with hot cocoa and popcorn. If you don’t have cable, check these movies out at your library. Check your local listings in the newspaper for dates and times.

  • Rudolph the Red-Nosed Reindeer
  • Shrek the Halls
  • A Charlie Brown Christmas
  • A Christmas Carol (1938)
  • Meet Me In St. Louis
  • White Christmas
  • A Christmas Story
  • It's A Wonderful Life
  • Frosty the Snowman
  • Frosty Returns
  • Scrooge (1970, Albert Finney)
  • The Polar Express
  • The Year Without a Santa Claus
  • National Lampoon's Christmas Vacation

What is your favorite holiday movie? My all-time favorite is "A Chrismas Story".

What inexpensive or FREE holiday activities will you and your family be participating in this year? Let us know in the comments.


Thanks for reading
FamilyBalanceSheet.

If you would like to receive FREE updates of FBS, there are four ways to do so:


This post is linked to:

Image: Paul / FreeDigitalPhotos.net

Monday, November 29, 2010

Roasted Rosemary and Garlic Potatoes


This is quite possibly my most favorite side dishes. It goes great with so many sandwiches, like Red Pepper and Feta Turkey Burgers, Turkey and Veggie Sloppy Joes and Pulled Chicken BBQ Sandwiches.

French fries are a weakness of mine, buy I don't like frozen french fries. These simple roasted potatoes taste so much better. My favorite potato to use is the Yukon Gold and it is the only potato I buy. It has a creamier texture than other potatoes.

Roasted Rosemary and Garlic Potatoes
  • 1 1/2 lbs potatoes, about 5 cups chopped into bite-sized pieces
  • 1 Tbsp chopped fresh Rosemary
  • 2-3 garlic cloves, minced
  • 1/2 tsp salt
  • 1/4 tsp pepper
  • olive oil

Mix the potatoes, Rosemary, garlic, salt and pepper together in a large bowl.

Drizzle with olive oil until well coated.

Spread flat on a large rimmed baking sheet.

Bake at 400 degrees for about 20 minutes or until your desired crispiness.

Enjoy.

Thanks for reading FamilyBalanceSheet.

If you would like to receive FREE updates of FBS, there are four ways to do so:


This post is linked to:

Tuesday, November 23, 2010

Three Frugal Gift Ideas for the Difficult People on Your List

Are there people on your Christmas gift-giving list that are impossible to buy for? For a variety of reasons these people are just plain difficult, maybe they are older and have everything, maybe they are picky, or maybe I'm just out of creative ideas.


3 Frugal Gift Ideas
  1. A Homecooked Meal.


    We give the gift of a homecooked meal to my grandparents. They really don't need or want anything and both of my grandmothers are trying to downsize. What my grandparents really want is to spend time with my family and we enjoy spending time with them. Make it special. Use the good china. Watch a movie or old home videos. Play a game. The gift is of time spent together and the memories made will last forever.
  2. Homemade Cookies of the Month Club
    Do you remember the episode of Everybody Loves Raymond where Ray and Debra give his parents a fruit of the month club membership? It is hysterical. "The pears, what am I going to do with all of these pears?" But honestly, I would love a fruit-of-the-month membership as a gift. When I checked it out as a gift possibility for a family member, I found that it doesn't fit into our budget, but Homemade Cookies of the Month does. Each month could be a different cookie recipe. The gift doesn't have to be for the entire 12 months of the year; you could do 3-6 months of delivering cookies to the recipient. Create a certificate on your computer to explain the gift. Package the cookies in pretty bag or box. Also, this is an opportunity to spend time with the recipient.
  3. Give the Gift of Giving
    For my fortieth birthday, our neighbors across the street gave me a card. Inside was a signed check for $20, but the 'pay to the order of' line was not filled in. There was a note attached that read, "In honor of your birthday, please fill out the check and send it to your favorite charity." I sent it to a local food bank. I received some wonderful gifts for my birthday, but this was my favorite that year.

I love Christmas, but I don't love the stress that seems to slip into the season. The gift of time and thoughtfulness can go a long way with our loved ones, without taking a big bite out of your balance sheet.

What frugal gift ideas do you have for the impossible people on your list?

Thanks for reading FamilyBalanceSheet. If you don't already receive FBS free updates, please click here to sign up.

This post is linked to:

Friday, November 19, 2010

Baked Turkey, Macaroni and Cheese


This recipe is dedicated to my oldest daughter, who would become a noodle if I let her. It's a great way to please your kids and use up turkey leftovers.

Baked Turkey, Macaroni and Cheese
inspired by Cooking Light
  • 8 oz elbow macaroni (a typical box is 16 oz)
  • 2 Tbsp olive oil
  • 1 onion, chopped
  • 1 cup shredded carrots
  • 3 garlic cloves, minced
  • 1 Cup Roasted Tomato sauce - or your favorite type
  • 2-3 cups chopped, cooked turkey
  • 1 tsp salt
  • 1/2 tsp pepper
  • 1 cup milk
  • 2 Tbsp flour
  • 1/8 tsp nutmeg
  • 1/2 tsp salt
  • 1 1/2 Cups Mexican cheddar jack cheese - or your favorite cheddar blend
1. Cook pasta according to the package.

2. Over medium-high heat, add olive oil to a large pan. Add onion, carrots, garlic and saute for 5 minutes.

3. Add turkey, tomato sauce, 1 tsp salt and pepper and cook for about 2 minutes.

4. Combine the turkey mixture with the cooked pasta. Spoon mixture into an 11 x 7 baking dish that has been coated with cooking spray or butter.

5. In a sauce pan, combine milk, flour, nutmeg and 1/2 tsp salt. Over medium heat, whisk continuously until well blended for about 2 minutes.

6. Add 1 Cup cheese and whisk constantly until smooth.

7. Pour cheese evenly over the turkey/macaroni mixture. Sprinkle the top with 1/2 cup cheese.

8. Bake at 350 degrees for about 20 minutes. Let the dish sit for 5 minutes before serving.

Serve with sweet peas and homemade applesauce. Enjoy!

Enjoy all of the posts from Turkey Week 2010:

Thanks for reading FamilyBalanceSheet.

If you would like to receive FREE updates of FBS through your RSS Feed, please click here to sign up. Or Subscribe by Email.

This post is linked to:

Thursday, November 18, 2010

Turkey, Kale & Orzo Soup


This is a really hearty soup and a great way to use up Thanksgiving turkey leftovers. My five year old gobbled it up and asked for 'more please'.

Turkey, Kale & Orzo Soup
  • 2 Tbsp olive oil
  • 2 celery stalks, chopped
  • 2 carrots, sliced thin
  • 1 onion, chopped
  • 4 garlic cloves, minced
  • 1 bunch kale, cut off stems, chopped fine
  • 2 qt. homemade turkey stock or store bought
  • 1 (14.5 oz) can diced tomatoes
  • 1 tsp Italian herb seasoning
  • 1/2 tsp pepper
  • 1 tsp salt
  • 2 cups Orzo pasta, uncooked
  • 2-3 cups chopped cooked turkey

In a large soup pot, heat olive oil over medium heat and saute the carrots, celery, onions, garlic and kale. Stirring often, cook 15 minutes.

Add turkey stock, tomatoes, seasonings.

Bring to a boil and add uncooked orzo. Reduce to a simmer and cook 10 minutes. Add turkey and stir to combine.

Serve with a salad and/or homemade applesauce and your favorite bread.

The soup becomes very thick on the second day, but thins out when heated up or you could add some more stock to thin it even more.

Enjoy all of the posts from Turkey Week 2010:


Thanks for reading FamilyBalanceSheet.

If you would like to receive FREE updates of FBS through your RSS Feed, please click here to sign up. Or Subscribe by Email.

This post is linked to:

Wednesday, November 17, 2010

Turkey Chili Potpie


“Mommy, can I have some more please?” Music to a mother’s ears, especially when she was asking for another helping of this dinner and not dessert.

This is a great way to use up Thanksgiving leftover turkey, but you could also use leftover cooked chicken.

Turkey Chili Potpie

  • 1 large red pepper, chopped
  • 1 large onion, chopped
  • 4 garlic cloves, minced
  • 2 Tbsp olive oil
  • 1 Tbsp chili powder
  • 1 tsp oregano
  • 1 tsp cumin
  • ½ tsp salt
  • 1 (14.5 oz) can diced tomatoes
  • 2 (15 oz) cans white beans
  • 1 Cup homemade turkey stock , or store bought
  • 3 Cups chopped, cooked turkey
cornbread topping
  • 1 Cup flour
  • ¾ Cup yellow cornmeal
  • 1 tsp sugar
  • 1 tsp baking powder
  • ½ tsp salt
  • ¼ tsp baking soda
  • 1 Cup buttermilk or milk
  • 1 egg

1. In a large skillet, heat oil over medium-high heat. Add onion, pepper, garlic and cook until soft, about 5 minutes, stirring often.

2. Add chili, oregano, cumin, salt, tomatoes, beans, stock, turkey, and bring to a boil. Reduce heat and cook 3 minutes.

3. Pour the turkey filling into a 13 X 9 baking pan coated with cooking spray. Set aside

4. Combine flour, cornmeal, sugar, baking powder, salt, and baking soda in a bowl. Mix together the buttermilk and egg and add to the flour mixture. Stir together until moist.

5. Spread the cornmeal mixture over the turkey filling. The cornbread mixture will be thick.


6. Bake at 425 degrees for 18 minutes.


Serve with a salad and homemade applesauce.

Printable version of Turkey Chili Potpie


Enjoy all of the posts from Turkey Week 2010: Thanks for reading FamilyBalanceSheet. If you would like to receive FREE updates of FBS through your RSS Feed, please click here to sign up. Or Subscribe by Email. This post is linked to:

Tuesday, November 16, 2010

How To Make Turkey Stock


Welcome to Turkey Week at Family Balance Sheet. We will be thawing, roasting, making gravy and stock and of course eating. Enjoy!Homemade turkey stock is easy to make and a great way to stretch your dollars. After you have stripped the roasted turkey clean of any meat, grab your crock pot to make some delicious and homemade stock.

What you'll need:
  • Turkey carcass and reserved neck
  • 1 onion, quartered
  • 2-3 celery stalks
  • 2-3 carrot sticks
  • 1 garlic head, remove some of the white papery cover, cut in half crosswise
  • 10-12 sprigs of fresh parsley and sage
  • 2 bay leaves
  • 10 peppercorns
  • 1 tsp salt
Place the carcass and reserved neck in a large crock pot. Add the rest of ingredients and fill the crock pot with water.

Turn on low overnight for 12 hours. When you wake up your kitchen will smell wonderful and the stock will be boiling. Turn crock pot off and let stock cool down.


Carefully, spoon or pour the stock, veggies, herbs through a sieve into a big bowl. Press juices out of veggies and herbs.


Discard bones, veggies, herbs.

Stir well and allow to cool down completely. Remove any fat that rises to the top.

I have found turkey stock to be more gelatinous than chicken stock once it has cooled down. Stock will last a few days in the fridge. I like to freeze in 1 cup and 24 oz freezer containers. This recipe made between 2 1/2 - 3 quarts.

Do you make stock from your turkey bones

Enjoy all of the posts from Turkey Week 2010:

Thanks for reading FamilyBalanceSheet.

If you would like to receive FREE updates of FBS through your RSS Feed, please click here to sign up. Or Subscribe by Email.

This post is linked to:

To Stuff Or Not To Stuff...I'm Talking About the Turkey

Welcome to Turkey Week at Family Balance Sheet. We will be thawing, roasting, making gravy and stock and of course eating. Enjoy!

When Melynda left a comment on my Roasted Turkey with Fresh Herbs and Lemon post that she always stuffs the bird, I realized that I forgot a very important component to Turkey Week...the stuffing. My mother always stuffs her bird and also makes additional stuffing for two reasons: she needs extra stuffing for all of the people and she doesn't like stuffing from inside the bird.

I have to say that I prefer stuffing that was made outside the turkey also. But I may be in the minority here.

What is your favorite way to make and eat stuffing? Inside the bird or outside? Let us know in the comments.

Enjoy all of the posts from Turkey Week 2010:

Thanks for reading FamilyBalanceSheet.

If you would like to receive FREE updates of FBS through your RSS Feed, please click here to sign up. Or Subscribe by Email.

How To Make Turkey Gravy

Welcome to Turkey Week at Family Balance Sheet. We will be thawing, roasting, making gravy and stock and of course eating. Enjoy!

This recipe serves 4-6 people. Adjust the ingredients to make more gravy for a larger crowd.

After your roasted turkey has cooled to slightly, move it to another pan/tray to finish resting and to carve.

Remove all but 3 Tbsp of turkey fat from roasting pan, leave any brown bits in pan.

Place roasting pan over 2 burners and heat both burners to medium. I used a front and back burner and it worked out well. If you are not comfortable with cooking the gravy this way, simply use a sauce pan, just be sure to scrap as much of the brown bits into the pan. That is where so much flavor comes from.

Add 3 Tbsp flour to the fat and whisk together to prevent burning and to form a paste, about 2 minutes. Mixture will bubble.


Add 1 1/2 Cups turkey stock and 1/2 Cup white wine. If you do not have wine, replace with stock. You can use chicken stock if you don't have turkey stock.

Continue whisking, scraping the bottom of pan and bring to a boil until gravy thickens, about 3 minutes.


To remove any brown bits, pour gravy through a fine sieve, buthis is not necessary.

Serve with your favorite Roasted Turkey and all of the fixins'.


Enjoy all of the posts from Turkey Week 2010:

Thanks for reading FamilyBalanceSheet.

If you would like to receive FREE updates of FBS through your RSS Feed, please click here to sign up. Or Subscribe by Email.

Monday, November 15, 2010

Roasted Turkey with Fresh Herbs and Lemon

Welcome to Turkey Week at Family Balance Sheet. We will be thawing, roasting, making gravy and stock and of course eating. Enjoy!

We have already thawed the turkey, now we are going to make a most delicious Roasted Turkey with Fresh Herbs and Lemon.

The turkey that I roasted was almost 13 lbs. If your turkey is larger, you can increase the below ingredients.
  • 1 12.75 lb turkey
  • 1 head garlic, remove outer papery layers, cut in half crosswise
  • 1 medium onion, quartered
  • 1 lemon, cut in half
  • 4-6 sprigs each of thyme, sage, parsley, rosemary or any variation of about 16-24 sprigs of these fresh herbs
  • 2 ribs celery
  • 3 Tbsp butter, melted
  • salt
  • pepper

1. Remove giblets and neck from inside of turkey. Set aside the neck in refrigerator for homemade stock. I discard the giblets.

2. Wash inside and out of turkey. Pat dry.

3. Sprinkle the inside of turkey with salt and pepper. Stuff the turkey with the garlic, onion, lemon, fresh herbs, celery.


4. Place turkey on a roasting rack in a roasting pan. Tuck the wings and tie the legs together.


5. Brush the outside of turkey with the melted butter and sprinkle with salt and pepper.

6. Roast at 325 degrees. Roast 2 1/2 hours or "when cooked to a minimum internal temperature of 165 °F as measured with a food thermometer. Check the internal temperature in the innermost part of the thigh and wing and the thickest part of the breast." That recommendation is from the USDA.

My turkey had a pop-up thermometer in it to let me know when it was done, but it is recommended that you check the temperature even if your turkey has a thermometer.


7. Cover turkey with foil and before cutting into it, let it rest for at least 20 minutes. This is the most important step and a key to turkey that is not dried out. So I’ll repeat, DO NOT CUT TURKEY FOR AT LEAST 20 MINUTES AFTER TAKING OUT OF OVEN.

I wish I could show you how to correctly carve a turkey, but I'm not very good at it, so I'm going to have to send you elsewhere to learn how to carve a turkey. But please come back, because Turkey Week isn't over yet at Family Balance Sheet.

Enjoy all of the posts from Turkey Week 2010:
Thanks for reading FamilyBalanceSheet. If you would like to receive FREE updates of FBS through your RSS Feed, please click here to sign up. Or Subscribe by Email. This post is linked to: