Thursday, May 31, 2012

Tackle that Tough Spot: Clear the Magazine Clutter

My name is Kristia and I am addicted to magazines.

I have stacks by my bedside...


and elsewhere...


It all started back in 1982 when my mother caved to my request for a Young Miss magazine (the back-to-school edition) while in the grocery store check out lane. The check out lane is an evil place for magazine hoarders.

The only thing that has changed in 30 years is that I don't buy magazines in the check out lane any more; I subscribe. Runner's World, Cooking Light, Money, Family Fun, Inc, and so on; you name it, my postman delivers it.

I do read them (they put me to sleep every night), but for some reason I have a hard time parting with them. I could stop subscribing to so many, but the publication companies know me too well. They have me at "FREE gift with your re-subscription."

So, I tackled the magazines. I ripped my address off each one and sent them packing to a magazine exchange at my CSA drop-off. And I'm proud to say that I didn't bring any back home with me.

Do you have piles of magazines around your home? Go tackle it!

Join me every Thursday for another installment of:


Thanks for reading. If you would like to receive FREE updates of FBS, there are four ways to do so:
Follow Me on Pinterest

Tuesday, May 29, 2012

Kids Bowl Free | Summer Fun Guide 2012


My kids were invited to a birthday party over the winter that was held at a bowling center. It was their first time bowling and they had a blast. The mom of the birthday girl told me about KidsBowlFree.com and I'm going to sign up my kids.

Basically, you sign your kids up at a local, participating bowling center and they receive certificates to bowl 2 FREE games a day all summer! Shoe rental is not included.

Per KidsBowlFree.com, the centers want to give back to the community and provide a safe environment for kids to spend their summer.

I like the idea of having an indoor summer activity for the kids when it is either raining or too hot to be outside.

Have you participated with KidsBowlFree.com? What was your experience? Let us know in the comments.

Thanks for reading. If you would like to receive FREE updates of FBS, there are four ways to do so:
Follow Me on Pinterest

Monday, May 28, 2012

Our New Waterpik Showerhead

My husband had a small honey-do list this past weekend.
  1. mow the lawn
  2. fix a towel bar in the bathroom
  3. install our new Waterpik showerhead

I received this Waterpik Medallion showerhead in the swagbag from Bloggy Boot Camp. It was totally unexpected and I am pretty excited about it.

This Waterpik is a handheld showerhead with 5 settings: full-body spray, powerspray, circular massage, mist, and water saver. The hand-held part made rinsing my girls' hair at bathtime so easy.

I love it. My kids love it. My husband...will learn to love it. He claims that he likes the old one better.

According to my husband, it was very easy to install. The hardest part was removing our old showerhead.


And don't worry, I had a honey-do list too this past weekend: the bathrooms needed cleaned. Which task would you rather do? I think he got off easy.

Thanks The SITS Girls and Waterpik for the sweet gift!

Thanks for reading. If you would like to receive FREE updates of FBS, there are four ways to do so:
Follow Me on Pinterest

Summer Grillin' Recipe Exchange | Every Monday June thru August


Are you ready to get your grill on?

Join us every Monday, starting June 4 through the end of summer, for the Summer Grillin' Recipe Exchange. I'll be posting a new recipe of my own and opening up a linky for bloggers to bring their favorite grilling posts to link up and share with readers. Whether it is an older post that you want to resurrect or a new post to share, please stop by and link it up.

Readers - My aim is to bring you some new grilling ideas every week and introduce you to other blogs.

Bloggers - I really want this linky to be successful and I would love for you to join me. If you are interested in being sent a reminder email on Monday mornings, leave a comment with your email or email me at familybalancesheet (at) gmail (dot) com.

Hope to see you next week.

Thanks for reading. If you would like to receive FREE updates of FBS, there are four ways to do so:
Follow Me on Pinterest

Thursday, May 24, 2012

$1 off Coppertone Suncare Product

Just in time for the holiday weekend!

$1.00 off Coppertone Suncare Product

Thanks for reading. If you would like to receive FREE updates of FBS, there are four ways to do so:
Follow Me on Pinterest

Disclaimer Notice - Please understand that I benefit financially from any products or services you may decide to purchase as a result of clicking on one of the links contained in this article or on this site. You can read the site's full disclosure here.

Tackle that Tough Spot: Purge the VHS tapes and Unused Media

When was the last time you watched a VHS tape? 


Our VCR started eating tapes a few years ago and we were not about to replace it or try to get it fixed.  But for some reason I never got rid of the tapes. As I was cleaning out our entertainment center I realized the craziness of keeping them, so I tackled it and the tapes are headed for the yard sale/giveaway box.

I also went through the stacks of CDs and DVDs. We download our music now, so there is no need for piles of CDs that we don't listen to. (That pile above is just a smidgen of what we have.)  The unopened DVDs of Seasons 1, 2, and 3 of The Office and Seinfeld are also heading to the yard sale box. We don't watch them, we have never watched them, and if we wanted to watch them, they are on cable TV every night. Honestly, I'm not quite sure how we got them.

Do you have stacks of VHS tapes, CDs, and DVDs lying around? Go tackle it!

Join me every Thursday for another installment of:


Thanks for reading. If you would like to receive FREE updates of FBS, there are four ways to do so:
Follow Me on Pinterest

Wednesday, May 23, 2012

My (almost) Square Foot Garden

The weather this past weekend was gorgeous, so I took advantage of it and finally planted my vegetable and herb garden.

I converted to a square foot garden in 2010 and it really changed the way that I garden. It is an efficient way of gardening. If you haven't read the book, Square Foot Gardening, I highly suggest you check out the book from your library. I ended up buying the book and I refer to it quite often.

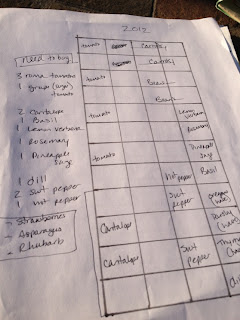
I referred to my garden notes from 2011 to plan this year.


I made my list and headed to the nursery with a $10 off $30 purchase coupon in hand.


I planted 3 Roma tomatoes, 1 grape tomato, 1 sweet pepper, 1 jalapeno, carrots, green beans, and many herbs. I also bought butternut squash to plant on my vertical trellis along with a cantaloupe. That was a last minute decision inspired by the selection at the nursery.


From this picture, the garden looks a little anemic, but I assure you that there are plants and seeds in my box. The bigger plants in the lower right corner are perennial herbs that survived our mild winter. This is the first year that parsley, oregano, and thyme came back for me.

I also need to find Lemon Verbena, an herb that I love to plant. This nursery was out and it makes a great addition to homemade iced tea.

So why (almost) Square Foot Garden? I didn't do a grid this year and you are supposed to have a grid to make it an official SFG. I couldn't find my masking tape that I use to grid the box and I was not about to run to the store for masking tape. I eyeballed it this year and I'm sure everything will turn out fine.

Did you plant your vegetable garden yet? Did you plant anything new and interesting this year? Let us know in the comments.

For more information check out the book, All New Square Foot Gardening by Mel Bartholomew.

Thanks for reading. If you would like to receive FREE updates of FBS, there are four ways to do so:
Follow Me on Pinterest

Disclosure: I am an Amazon Associate, and if you make a purchase through my link, I earn a small percentage--at no cost to you! Thanks for supporting Family Balance Sheet.

Tuesday, May 22, 2012

Homemade Sidewalk Chalk

Today I’m participating in the Ultimate Blog Swap. You’ll find me posting over at The Holistic Mama about Saving Money on Organic Food, and I’m excited to welcome Camille from Growing Up Gabel to Family Balance Sheet:
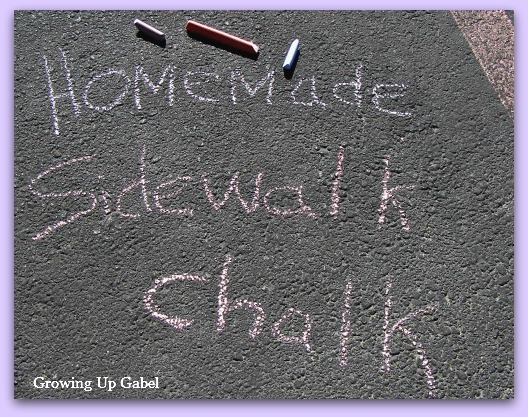


One of the many ways that I save money is by making things I would otherwise buy at the store. It's amazing the items we purchase that can actually be made quite easily at home! So when I saw a tutorial for homemade sidewalk chalk, I knew I had to try it.

When I went to the craft store to buy the supplies, I started doubting that it was less expensive to make the chalk rather than just buying it. I wasn't able to find small containers of any of the items I needed, but I was able to use coupons for 40% and 50% off to cut the cost of this project in half. I spent around $9 total for the supplies, but I'm also pretty sure we have enough materials to make chalk for years! And now I'm on the lookout for art projects that involve Plaster of Paris.

Almost every single tutorial I've seen for sidewalk chalk uses toilet paper rolls for the mold. I would suggest using wax lined paper cups instead. I had a really hard time with the toilet paper rolls. We also tried out a silicone ice cube tray and it worked so much better! So just ignore the TP rolls and go for cups or any kind of ice cube tray.

If you want to try the TP rolls, duct tape the bottoms securely and then line with wax paper.

To make the chalk you will need Plaster of Paris and powder tempera paint and water.
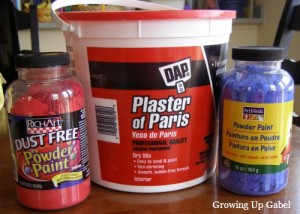


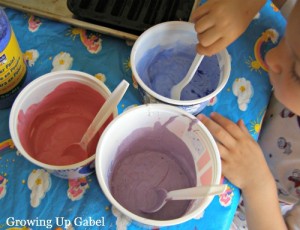
For each color of chalk you will need 1 container to mix in. I used old cottage cheese and yogurt containers and just tossed them when we were done. I also used plastic utensils to mix so I could toss those, too! I put a large vinyl tablecloth that we use for art projects down on the table. You have to work fairly quickly with this since the plaster starts to set up in about 20-30 minutes. So get everything ready to go and then start. From start to finish, these only took us maybe 10 minutes to make.

When you are all set up and ready to go, pour 1/2 cup warm water into each mixing container. Add in 1 cup Plaster of Paris and mix well. Add 1/4 cup of powder paint, or more if you want darker colors and stir to combine. We made red/pink, blue and purple. In the process we learned that red and blue make purple.


Pour the colored plaster mixture in to your desired molds. You can see that we used an ice cube tray that makes long ice for water bottles. I ended up putting foil over the TP rolls because our mixture was leaking out! Thus the reason I suggest cups instead.
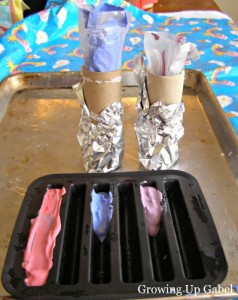


Let dry. We live in the desert with single digit humidity so these dried within a day for us. If you live in a more humid climate these can take a few days to dry. Once they are dry, peel away the paper cup or pop out of the ice cube tray. I only made half the recipe I've posted here and it was not nearly enough as you can see. As long as you're make a mess, you might as well make a nice big batch of chalk.
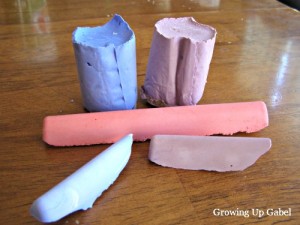


My 3 and 5 year old had a ball making these and they keep asking to make more. Thankfully, I have enough supplies to keep us stocked up with chalk all summer long!

Homemade Sidewalk Chalk

Supplies:
  • Plaster of Paris
  • Powder Tempera Paint
  • Water
  • Plastic containers and utensils
  • Molds for the chalk (paper cups, ice cube trays, etc)
Instructions
  1. Pour 1/2 cup warm water into each container.
  2. Mix in 1 cup Plaster of Paris and mix well.
  3. Add 1/4 cup of powder paint, or more if you want darker colors.
  4. Pour the paint mixture in to molds and allow to dry. The drying process can take a few days depending on your weather and the mold used.


Visit Life Your Way to see all of the Ultimate Blog Swap participants!


Thanks for reading. If you would like to receive FREE updates of FBS, there are four ways to do so:
Follow Me on Pinterest

This post is linked to Frugal Friday at Life as MOM.

Monday, May 21, 2012

My Day @ Bloggy Boot Camp


This past Saturday, I woke up bright and early and headed east to Philadelphia to attend my first blog conference. I sucked up my fear of walking into a room and not knowing ANYONE and I spent the day listening, learning, and absorbing tons of information to help me improve my writing, my blog, and my business.

Bloggy Boot Camp is run by The SITS Girls: Tiffany Romero and Francesca Banducci. They are two witty, sharp, and savvy women who are a wealth of knowledge about blogging, business, and social media. They also lined up a stellar group of speakers. I took 15 pages of notes from the 6 sessions:
  • Top 10 Tips for Blogging Success - Laurie Turk from Tip Junkie
  • Video Unveiled: Getting View on You Tube - Colleen Padilla from ClassyMommy
  • Expanding Your Platform Beyond Your Blog - Audrey McClellan from Mom Generations
  • Business of Blogging Workshop run by Laurie Turk, Tiffany Romero, Allison Tallamantez, and Danielle Liss.
  • SEO: 10 Things to Make Google Love Your Blog - Dali Burgado from Secrets to Web Success
  • Proven Methods to Grow Your Site and Increase Your Influence - Sharon Rowley from Mom of 6
I also met a lot of other bloggers, traded tons of business cards, ate a delicious lunch provided by Kings Hawaiian, and received an unexpected, but sweet swag bag provided by all of the conference sponsors: Mirassou WineryWaterPik, Happy Family Organic SuperFoods, and Care.com.

On the way home, my head was spinning with ideas and flashbacks from the day. Honestly, I think my head exploded somewhere along the PA Turnpike. I arrived home exhausted, but energized about all of the possibilities for Family Balance Sheet.

Thanks for reading. If you would like to receive FREE updates of FBS, there are four ways to do so:
Follow Me on Pinterest

Visit The SITS Girls for posts from other bloggers of their experience at Bloggy Boot Camp.

Thursday, May 17, 2012

Tackle that Tough Spot: Above the Refrigerator

Have you looked on top of your refrigerator lately?

Go ahead, don't be afraid, take a look.


I'm tall, so that might be one reason the top of the refrigerator becomes a dumping ground. It is also a spot that little hands can't get to, so I'll use that as an excuse too.

So, I tackled it. I gave borrowed DVDs back to their rightful owner. I found a new (out of sight) home for the big supplement containers. And tools were sent back to the tool box. My kitchen feels so much lighter now.


What does the top of your refrigerator look like? Go tackle it!

Join me every Thursday for another installment of:


Thanks for reading. If you would like to receive FREE updates of FBS, there are four ways to do so:
Follow Me on Pinterest

Monday, May 14, 2012

Chicken, Pinto Beans & Rice Casserole


Pin this Recipe

Chicken, Pinto Beans & Rice Casserole is a hearty and versatile dish. If you don't have pinto beans, replace them with another bean, such as red or white or black or chick peas. Cooked pinto beans were in my freezer, so that is what I grabbed. I had a lot of beans and rice leftover (the chicken was devoured at dinner), so I used it as a filling for burritos the next day.

Enjoy!

Chicken, Pinto Beans & Rice Casserole

Inspired and Adapted from Family Circle

Ingredients

  • 2 Tablespoons olive oil
  • 6 skinless, boneless chicken thighs
  • 1 large onion, chopped
  • 3 garlic cloves, minced
  • 1 red pepper, chopped
  • 2 teaspoon cumin
  • 1 teaspoon oregano
  • 3 cups homemade chicken stock, or store bought
  • 1 (16 oz) can pinto beans, drained and rinsed
  • 1 (14.5 oz) can diced tomatoes
  • ½ teaspoon salt
  • ¼ teaspoon pepper
  • 1 ½ cups uncooked long grain rice

Instructions

1. Preheat oven to 400 degrees.

2. In a 6 qt. lidded Dutch oven, heat the oil over medium-heat. Add the chicken and cook for about 5 minutes each side. Remove from Dutch oven and set aside on a plate.

3. Add the garlic, onion, and pepper; stir and cook until softened. Scrap the bottom of the pan to loosen the browned chicken bits and mix in with the garlic/onion/pepper mixture. This will add flavor to the dish.

4. Add the cumin, oregano, stock, beans, tomatoes, salt, and pepper and stir to combine.

5. Bring the stock to a simmer and add the rice. Stir to combine. Add the chicken back to the pan. Cover and move the Dutch oven to the oven. Bake for 20 minutes or until the rice has cooked all the way through and the liquid is absorbed.

Print recipe for Chicken, Pinto Beans & Rice Casserole.

Thanks for reading. If you would like to receive FREE updates of FBS, there are four ways to do so:
Follow Me on Pinterest

This post is linked to Ultimate Recipe Swap.

Thursday, May 10, 2012

Tackle That Tough Spot: Plastic Ware

Today's Task: Reduce the proliferating Plastic Ware

Please tell me that I'm not the only one with plastic ware stuffed in every empty crevice of the kitchen cupboards.


My husband, who normally doesn't comment too much on the state of our home, was even fed up with the amount of plastic ware that we had. I could hear him gripe every morning as he was packing his lunch about not being able to find a lid that matches a bowl.

One family doesn't need this much plastic ware. I'm not even sure how we acquired it, because I don't remember buying any of it.

I pulled it all together and stacked it in the yard sale box. I'll mark it all FREE just to get rid of it.

Instead of the plastic ware, I'll use the Pyrex. It stacks easily in the fridge or in the cupboards. It will be so much easier to find the matching lid.


How much plastic ware do you have? Go tackle it!

Join me every Thursday for another installment of:


Thanks for reading. If you would like to receive FREE updates of FBS, there are four ways to do so:
Follow Me on Pinterest

Tuesday, May 8, 2012

My (Half Crazy) Weekend in Pittsburgh

In case you weren't aware, I'm only half crazy, not full blown crazy, just half.

We spent this past weekend exploring Pittsburgh. We took the incline to Mt. Washington...


...where we took in some incredible views...


...and ate a little ice cream.


We had a wonderful time visiting a great city.

But then at 5:30 on Sunday morning, I woke up, ate a big breakfast, and headed downtown ...

...to become a Runner of Steel.


I ran the Pittsburgh Half Marathon, because like I said, I'm only half crazy.


It was a hot morning and I finished the race 2 minutes faster than my last half marathon.  Two minutes feels like an eternity at the end of 13.1 miles!


To celebrate the race and my time, we had lunch at Primanti Bros.


If you have never heard of Primanti Bros, it is a Pittsburgh attraction, because their sandwiches are stuffed ridiculously high with your choice of meat (I chose ragin' cajun chicken), cole slaw, and french fries...IN the sandwich, not on the side.

I ate the WHOLE sandwich.

So maybe I am full blown crazy, but it was worth every single bite!


Thanks for reading. If you would like to receive FREE updates of FBS, there are four ways to do so:
Follow Me on Pinterest